Za Chuma, step by step
Everything the app does and how to use it — from installing it on your phone to planning your path to a wealth target. Screenshots use the demo data described in section 13.
1. About Za Chuma
Za Chuma is a personal finance and wealth-planning app that runs on your phone. It tracks money across your bank accounts, mobile money wallets and cash, your assets and investments, and what you owe or are owed — and helps you plan what to do with what's left.
How it thinks about your money
- A real ledger. Every transaction is double-entry, like in an accounting system: money leaves one account and arrives in another (or in a category such as Groceries). That's why balances, net worth and reports always reconcile.
- Estimate → actual. Anything planned (salary, rent, an instalment, interest) appears as expected. When it happens you confirm the actual amount.
- Honesty. You tag each expense as a need or a want; taxes, levies and fees get their own totals; unrecorded money shows up as “unrecorded spending” when you check a balance.
- Private and offline. Data lives only in your phone's browser storage. There is no account, server or tracking. Backups are files you keep.
Finding your way around
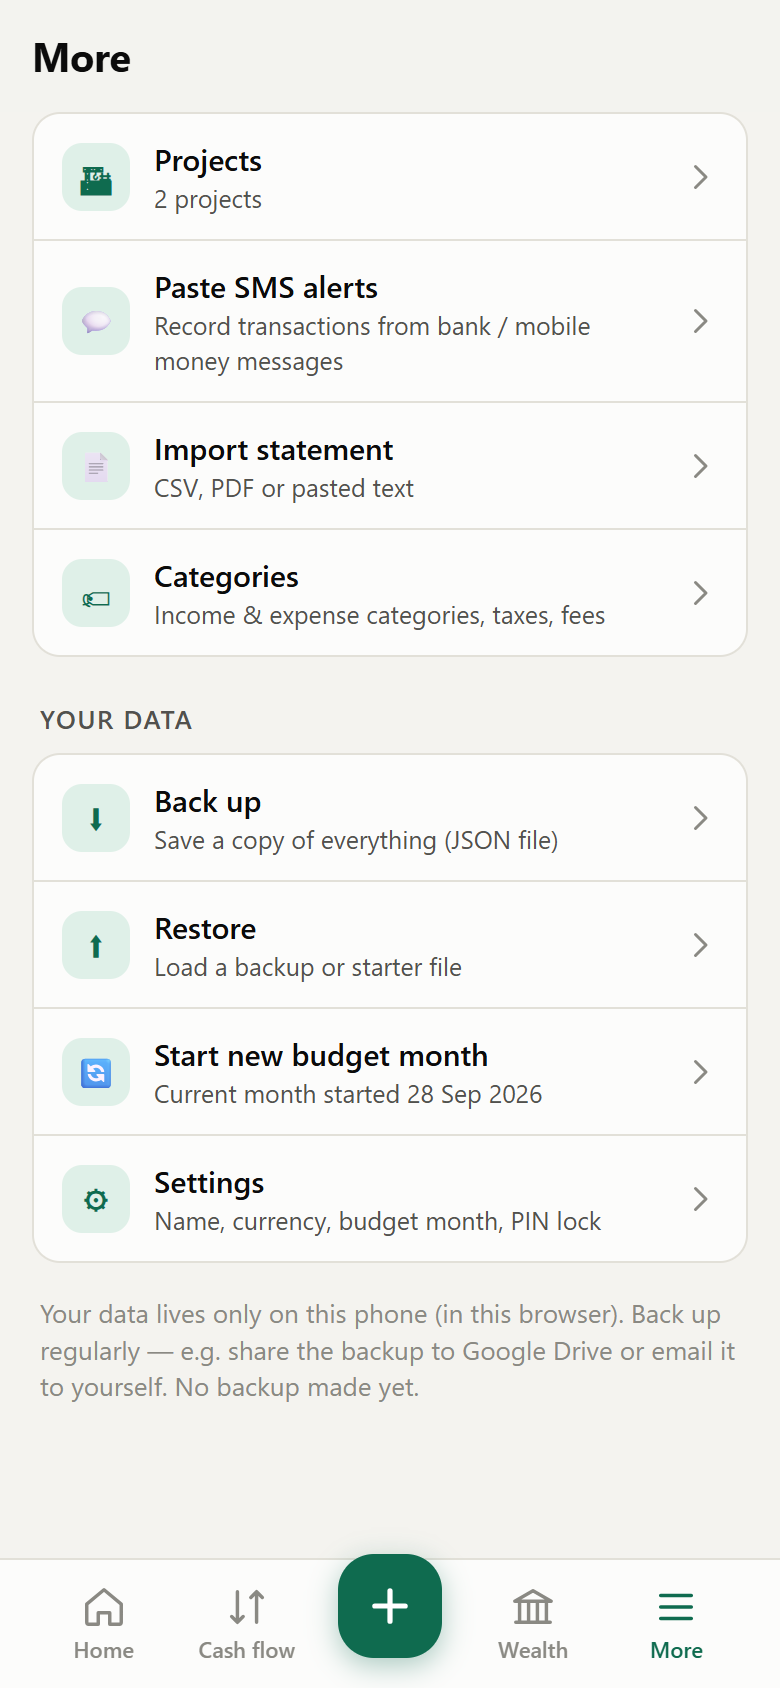
The app opens on Home. The bar at the bottom takes you to Home, Cash flow, the green + (add anything), Wealth and More (projects, import, categories, backup, settings). Tap a chart to read its values; tap any row to open it.
2. Getting set up
2.1 Install the app on your phone
Za Chuma is a web app you install from the browser (a “PWA”). Once installed it has its own icon, opens full-screen and works offline.
Android (Chrome)
- Open app.zachuma.online in Chrome.
- Tap the ⋮ menu → Install app (or Add to Home screen).
- Open Za Chuma from the new icon.
iPhone (iOS 16.4 or newer)
- Open app.zachuma.online in Safari (on iOS 17+ Chrome also works).
- Tap Share → Add to Home Screen.
- Always open Za Chuma from the home-screen icon — the installed app keeps its own data, separate from Safari tabs.
2.2 First run: settings
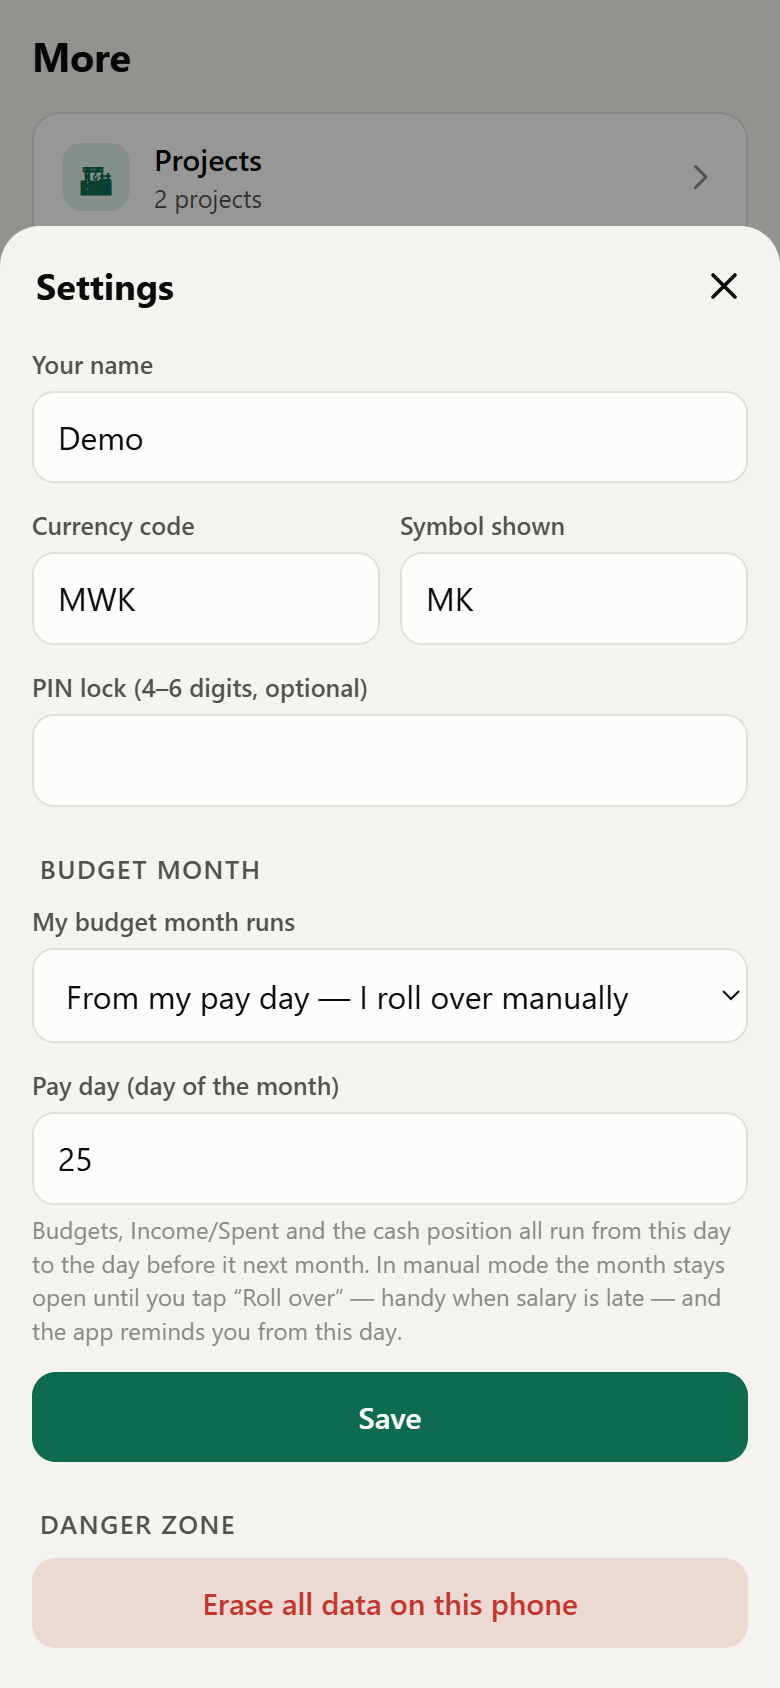
- Go to More → Settings.
- Enter your name (Home greets you with it), your currency code and the symbol to show (e.g.
MWK/MK). - Choose how your budget month runs — calendar month, or from pay day (see section 7) — and enter your pay day.
- Optionally set a 4–6 digit PIN; the app will ask for it each time it opens.
- Tap Save.
2.3 Add your money accounts
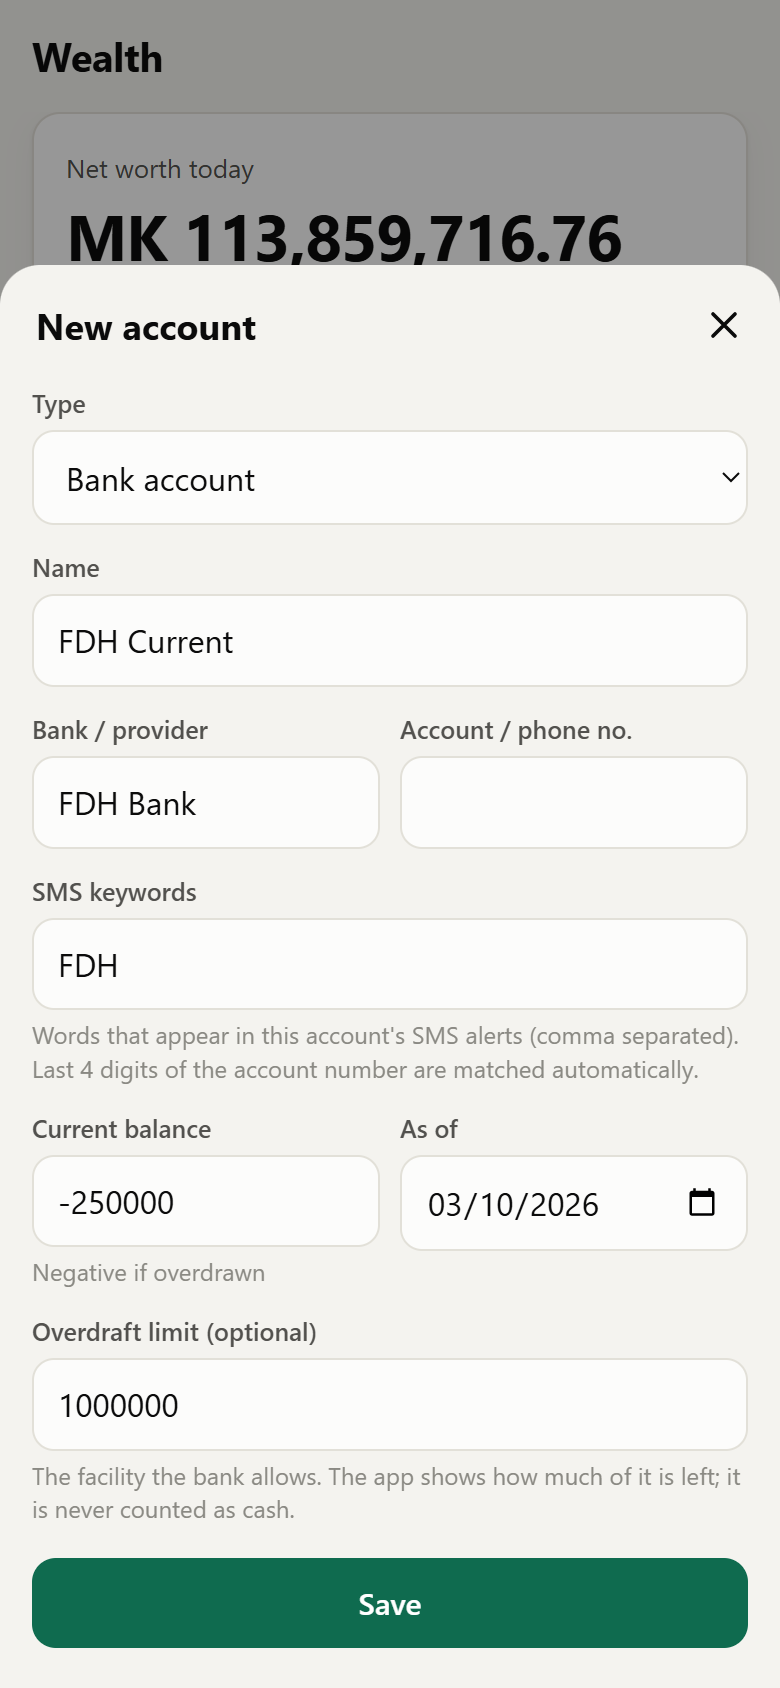
- Open Wealth → + Account (in “Bank, mobile money & cash”).
- Pick the type: Bank account, Mobile money wallet, Cash, or Credit card / overdraft (debt).
- Give it a name, the bank/provider and account or phone number.
- SMS keywords: words that appear in this account's SMS alerts (e.g.
Mpamba, TNM). Pasted messages are matched to the account automatically; the last 4 digits of the account number are matched too. - Current balance and As of date — negative if the account is overdrawn. This becomes the account's opening balance.
- For a bank account you can add an Overdraft limit (see 8.2).
- Tap Save. Repeat for every bank account, wallet and your cash in hand.
2.4 Add assets, investments and loans
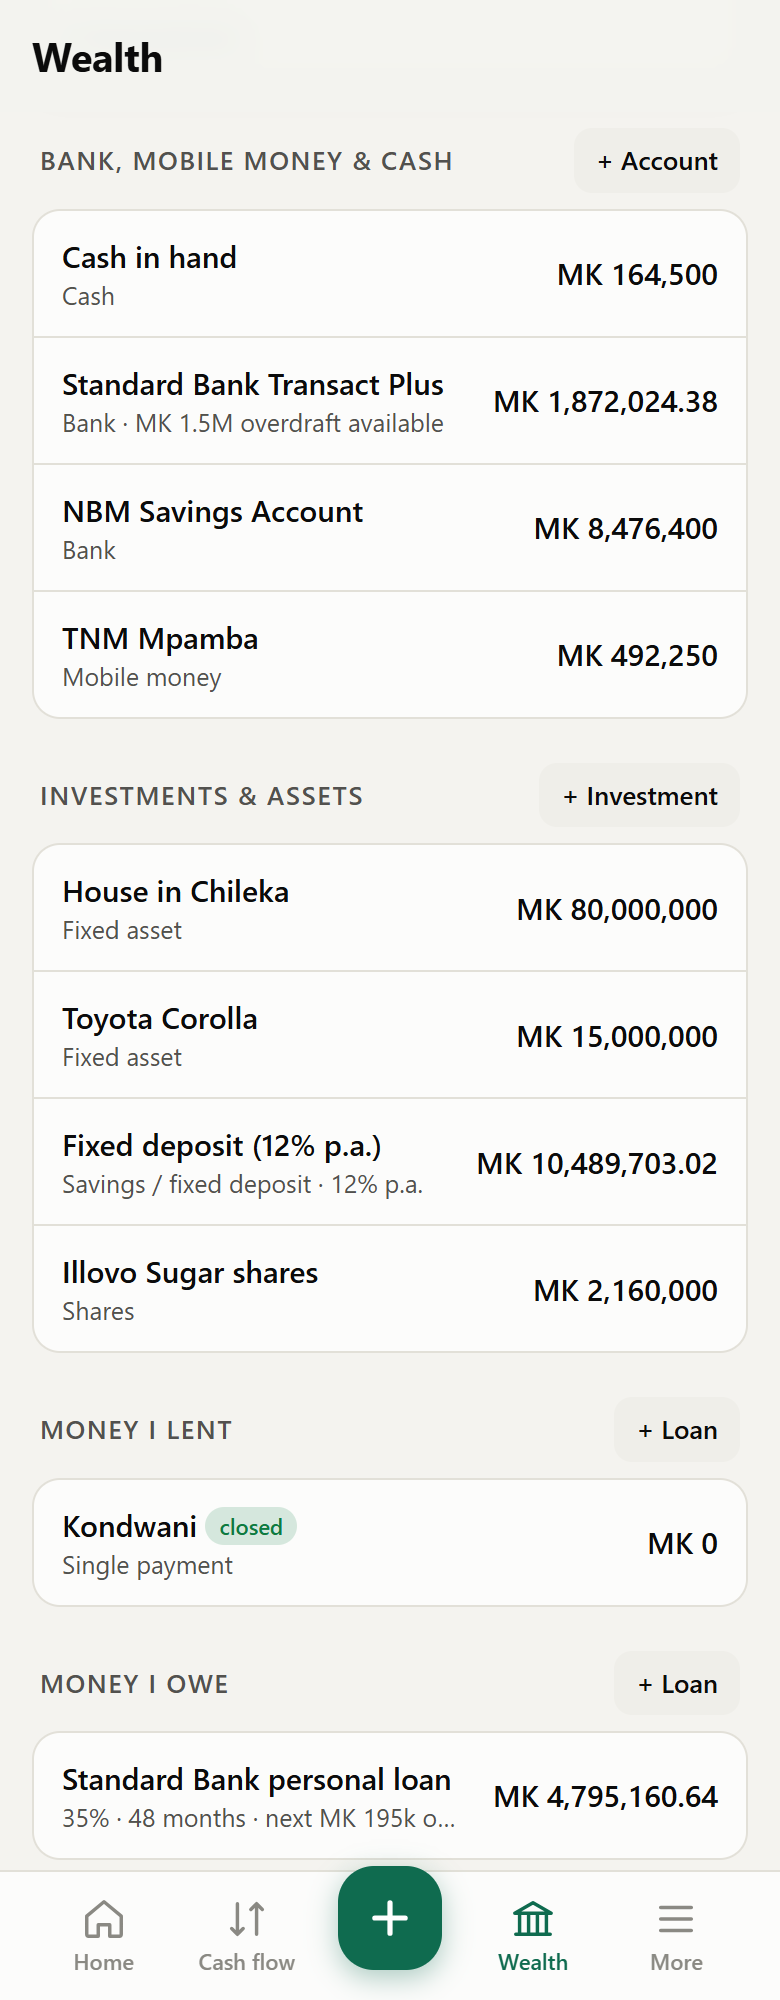
Add your house, vehicle, fixed deposits, unit trusts and shares under Wealth → + Investment (8.3), and any loans under + Loan (9). Your net worth is complete once these are in.
2.5 Add your recurring income and bills
Add salary, rent, utilities, school fees and other regular items as planned & recurring items (6.2). They drive your budget, “Due & expected” and the savings plan.
3. The Home dashboard
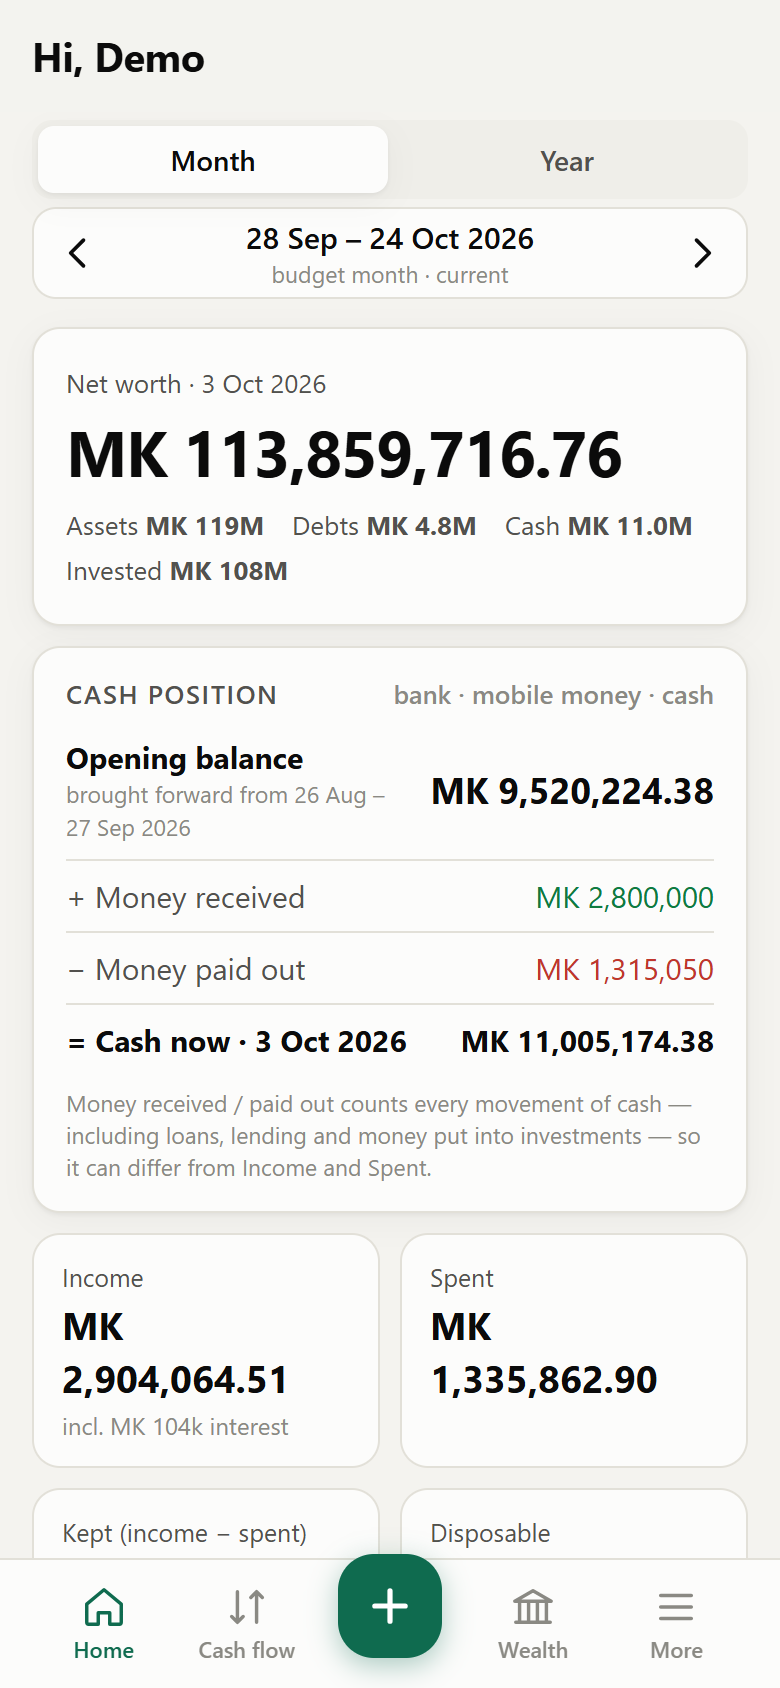
Home summarises one period. Use Month / Year and the arrows to move between periods. If you use a pay-day budget month the bar shows its dates (e.g. “28 Sep – 24 Oct 2026”) and its status: current, not rolled over yet or projected.
| Card | What it tells you |
|---|---|
| Net worth | Everything you own (accounts, assets, money owed to you) minus everything you owe. |
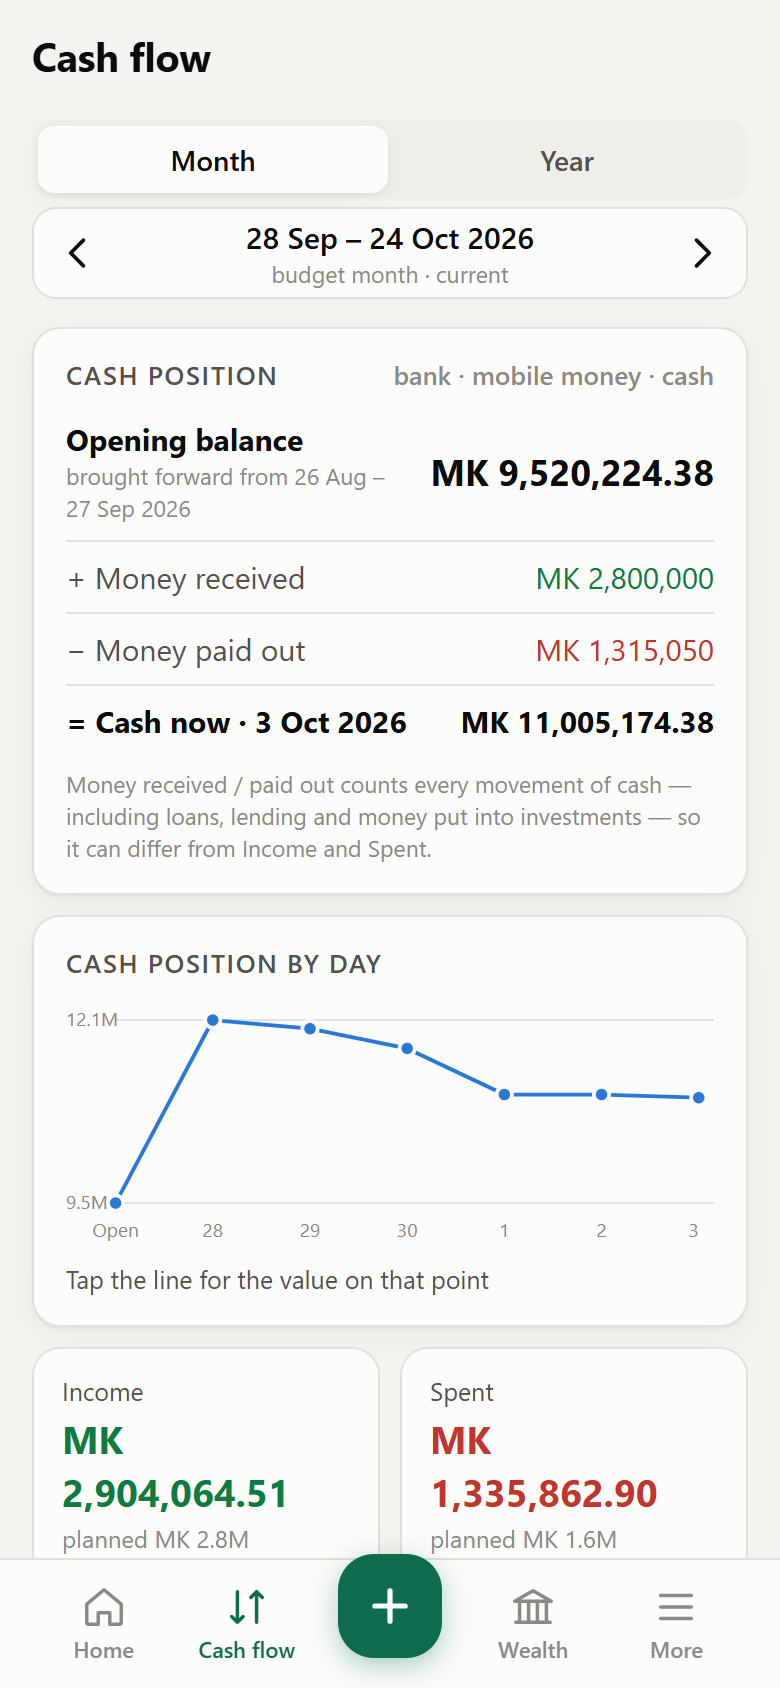
| Cash position | Opening balance (last month's closing cash across bank, mobile money and cash) + money received − money paid out = cash now. It counts every movement of cash, including loans and money moved into investments, so it can differ from Income/Spent. An overdraft limit is never counted as cash. |
| Income / Spent | Income and expenses for the period, excluding transfers between your own accounts. |
| Kept / Disposable | Kept = income − everything spent. Disposable = income − needs − taxes & fees − loan interest and principal − untagged spending (wants left in, so it shows what you could have kept). |
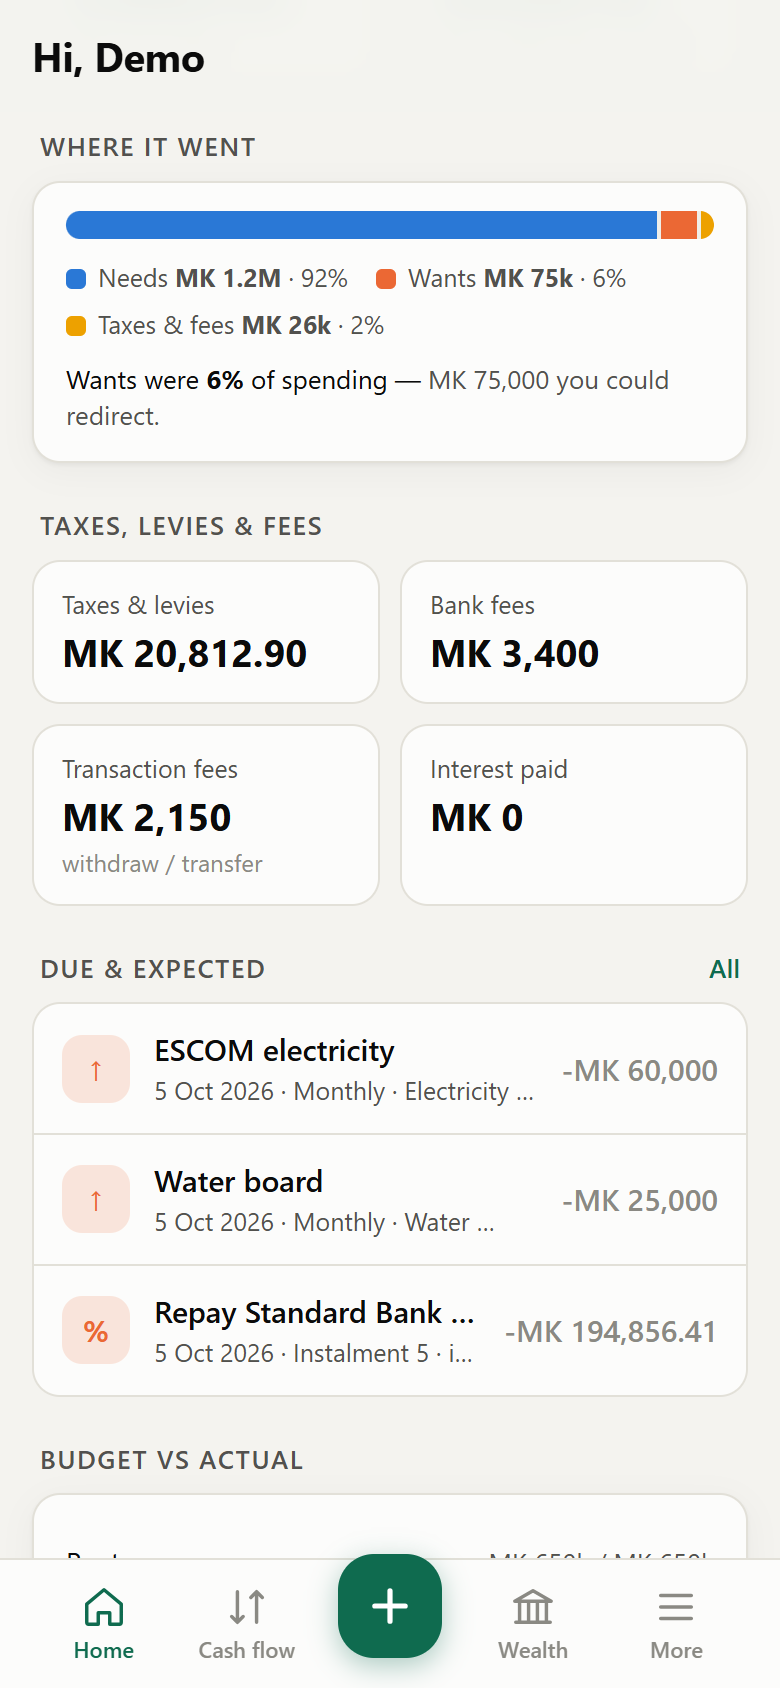
| Where it went | Spending split into needs, wants, taxes & fees, interest and not-tagged, with your “wants” share. |
| Taxes, levies & fees | Totals for taxes & levies, bank fees, transaction (withdrawal/transfer) fees and interest paid. |
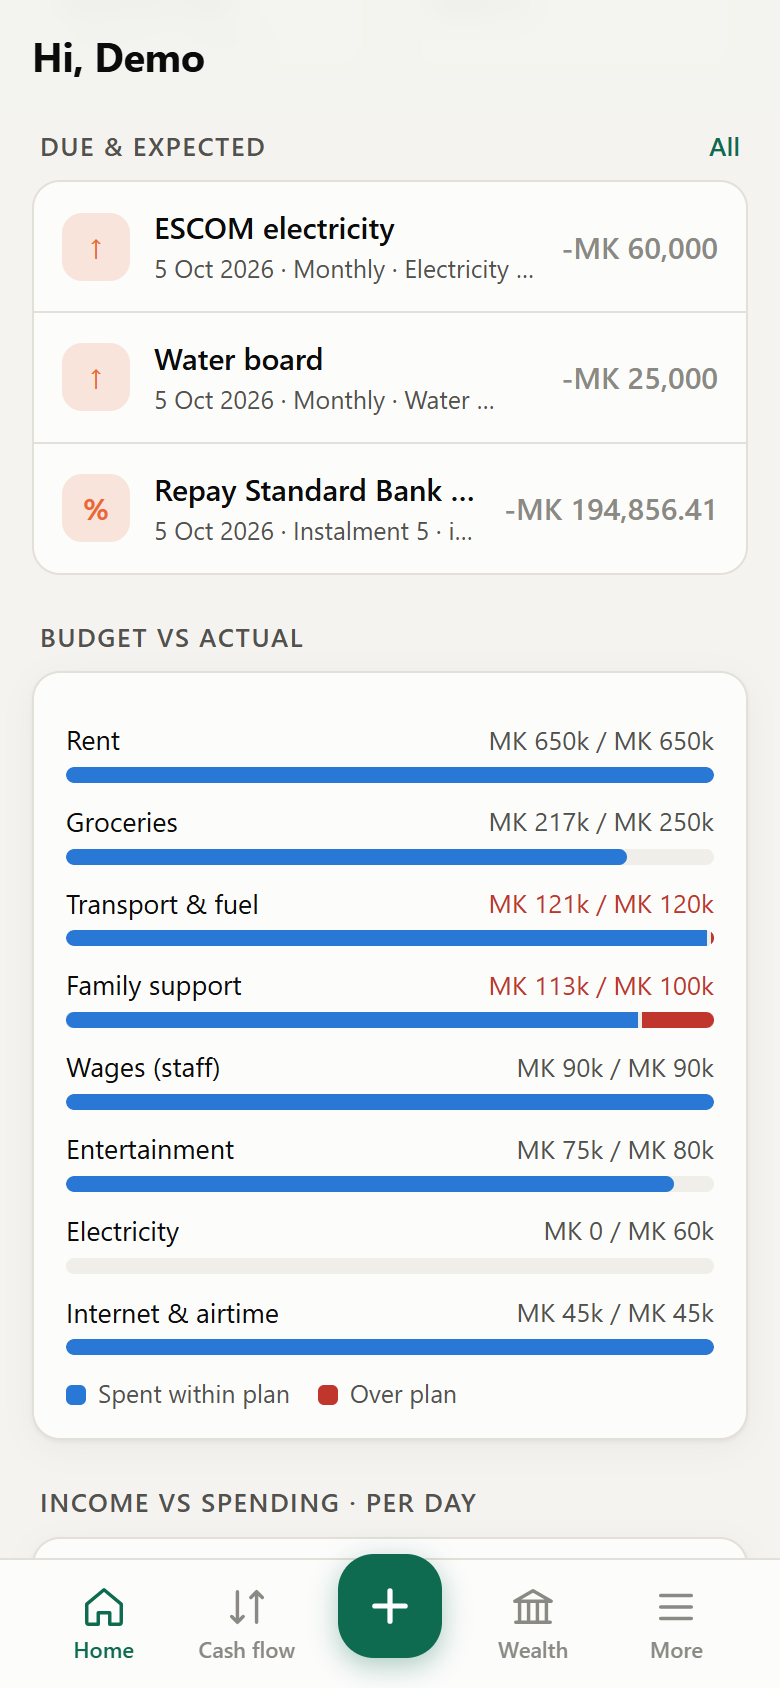
| Due & expected | Planned items overdue or due in the next 14 days. Tap one to record the actual. |
| Budget vs actual | Every budgeted category, spent against planned (red when over), then spent without a budget: categories you spent on but haven't budgeted for. |
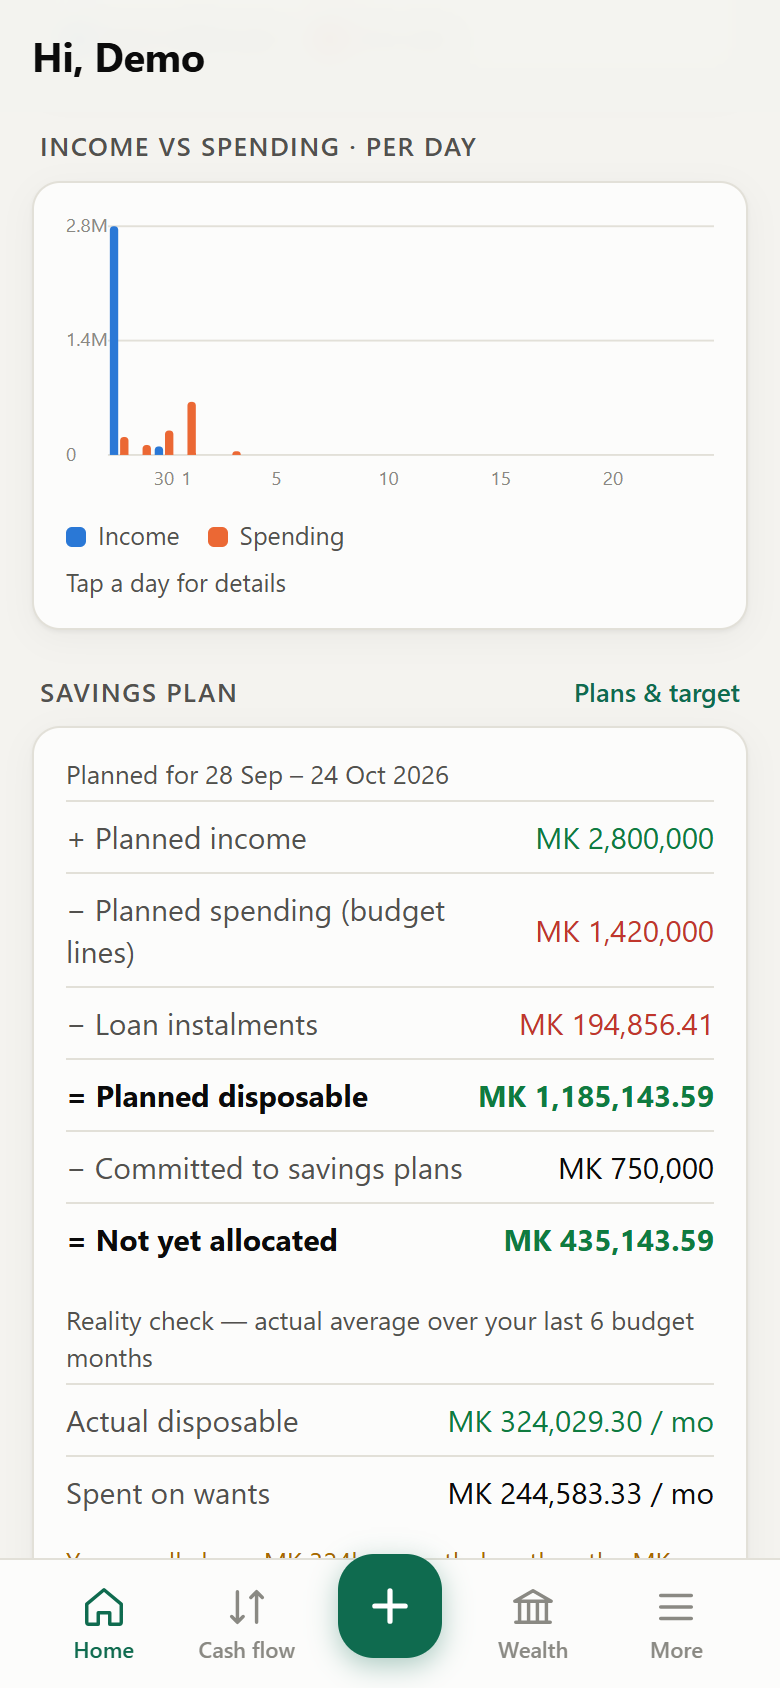
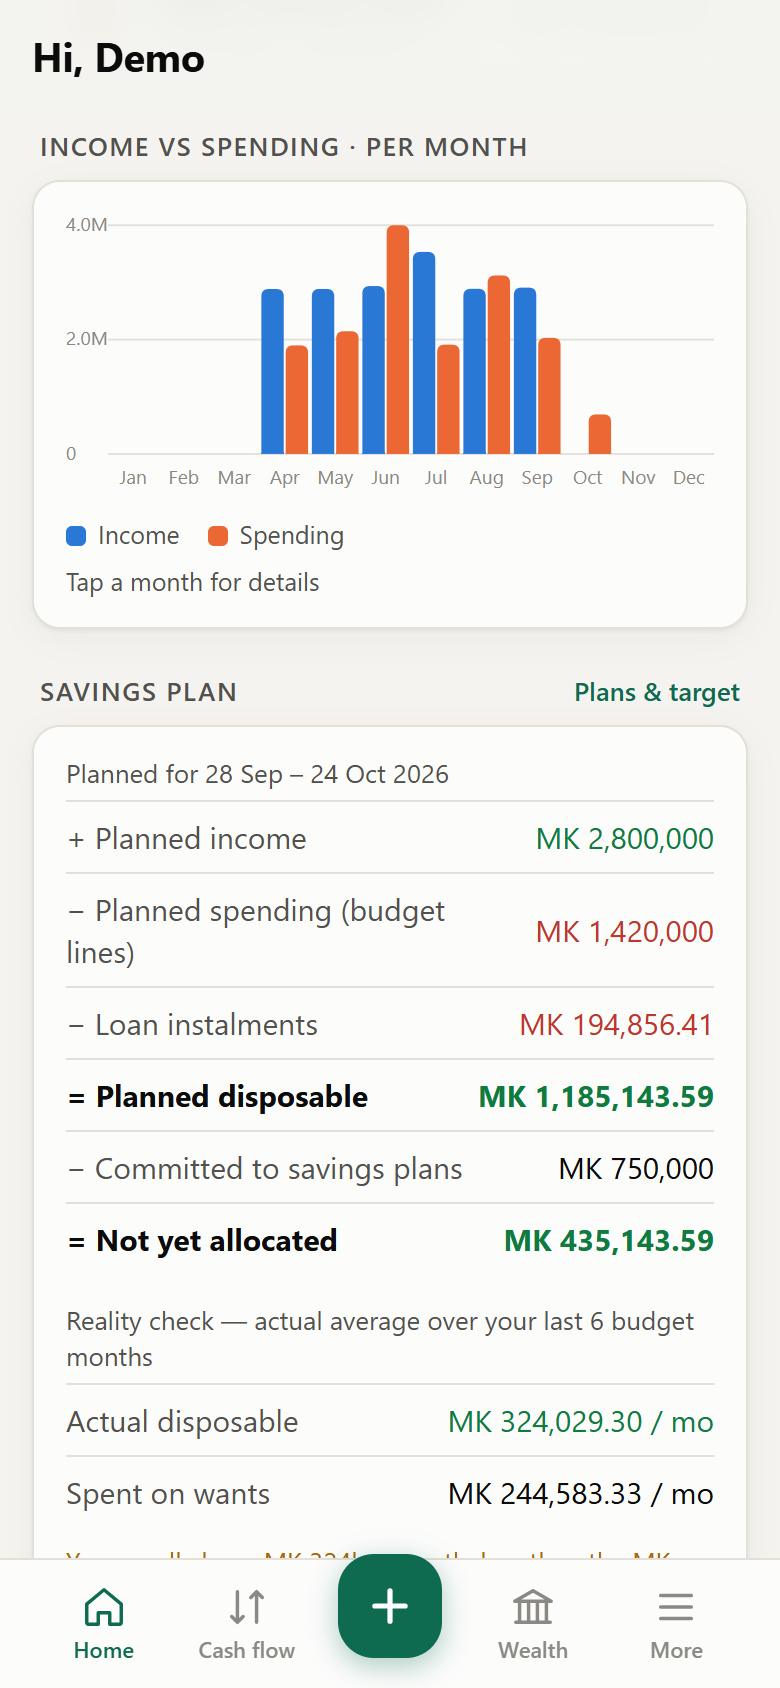
| Income vs spending | Columns per day (month view) or per month (year view). Tap a column for the amounts. |
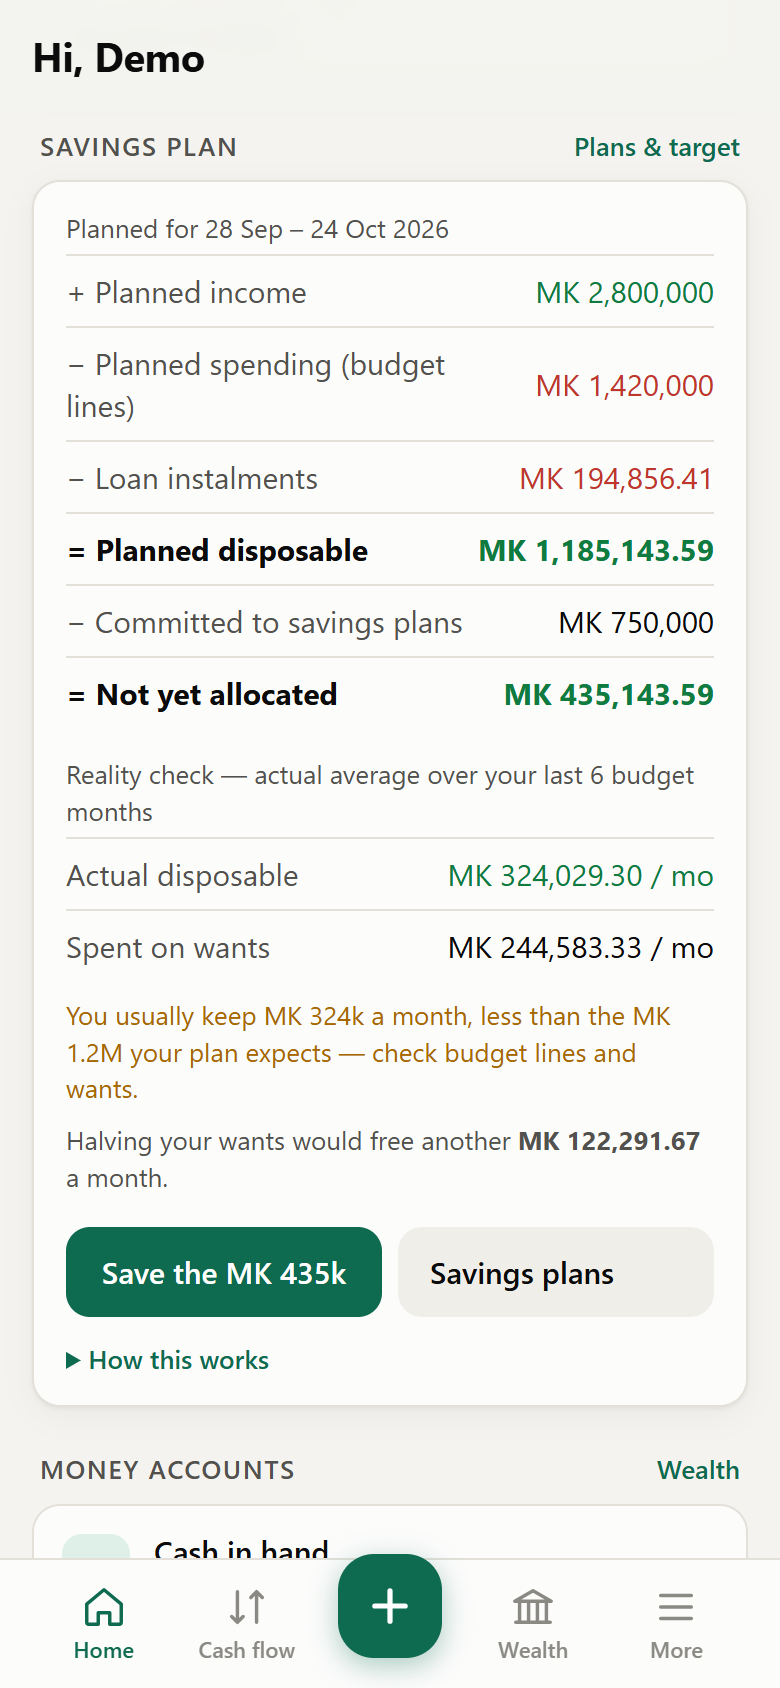
| Savings plan | Planned disposable for the budget month, what your savings plans commit, and what's not yet allocated — plus a reality check from your actual averages (11). |
4. Recording money
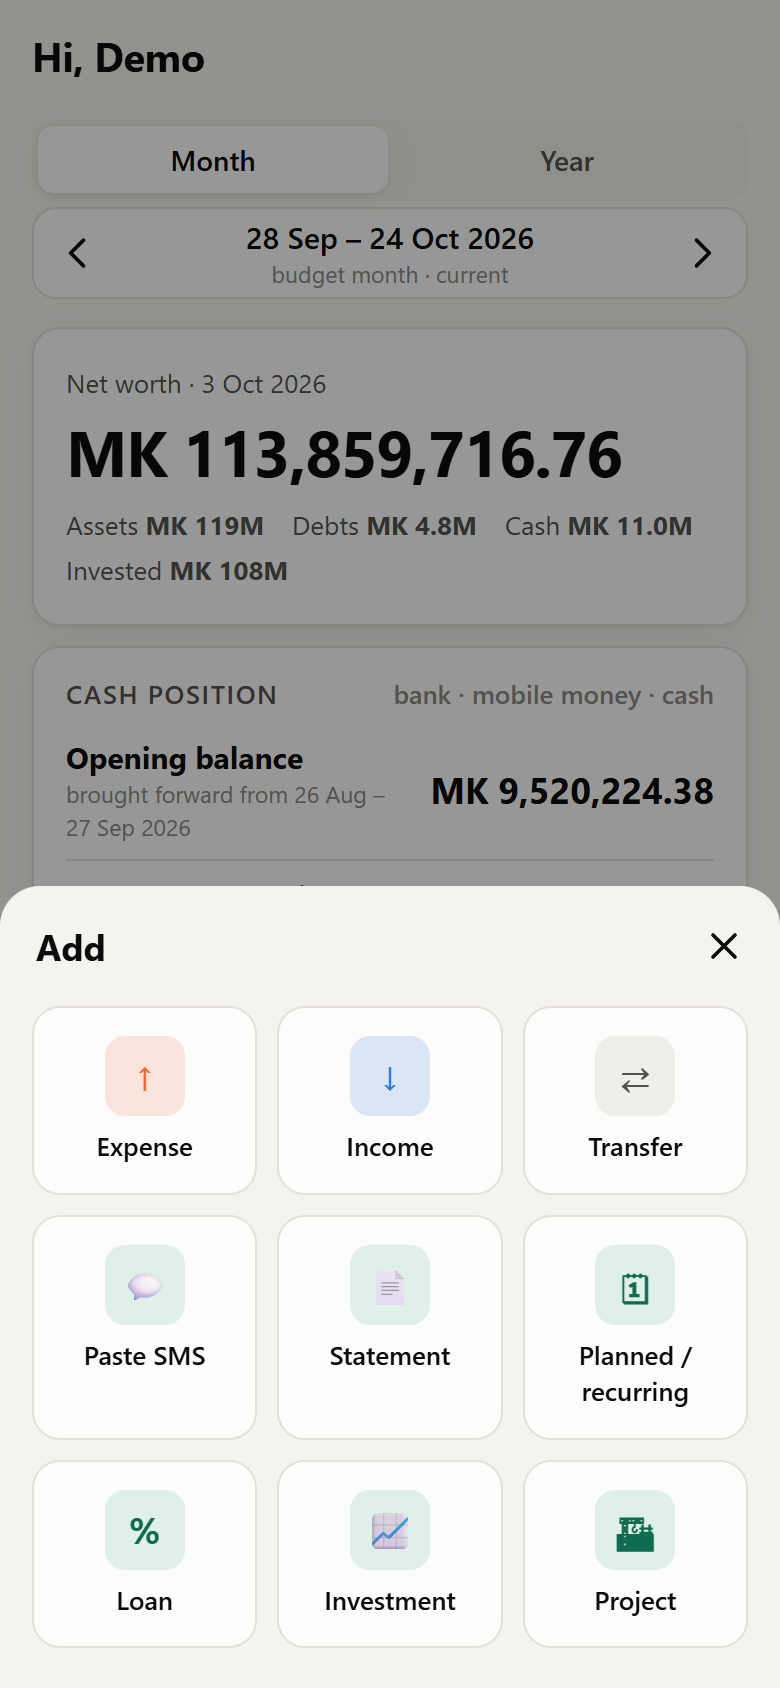
Tap the green + to add an expense, income, transfer, paste SMS, import a statement, or create a planned item, loan, investment or project.
4.1 Record an expense
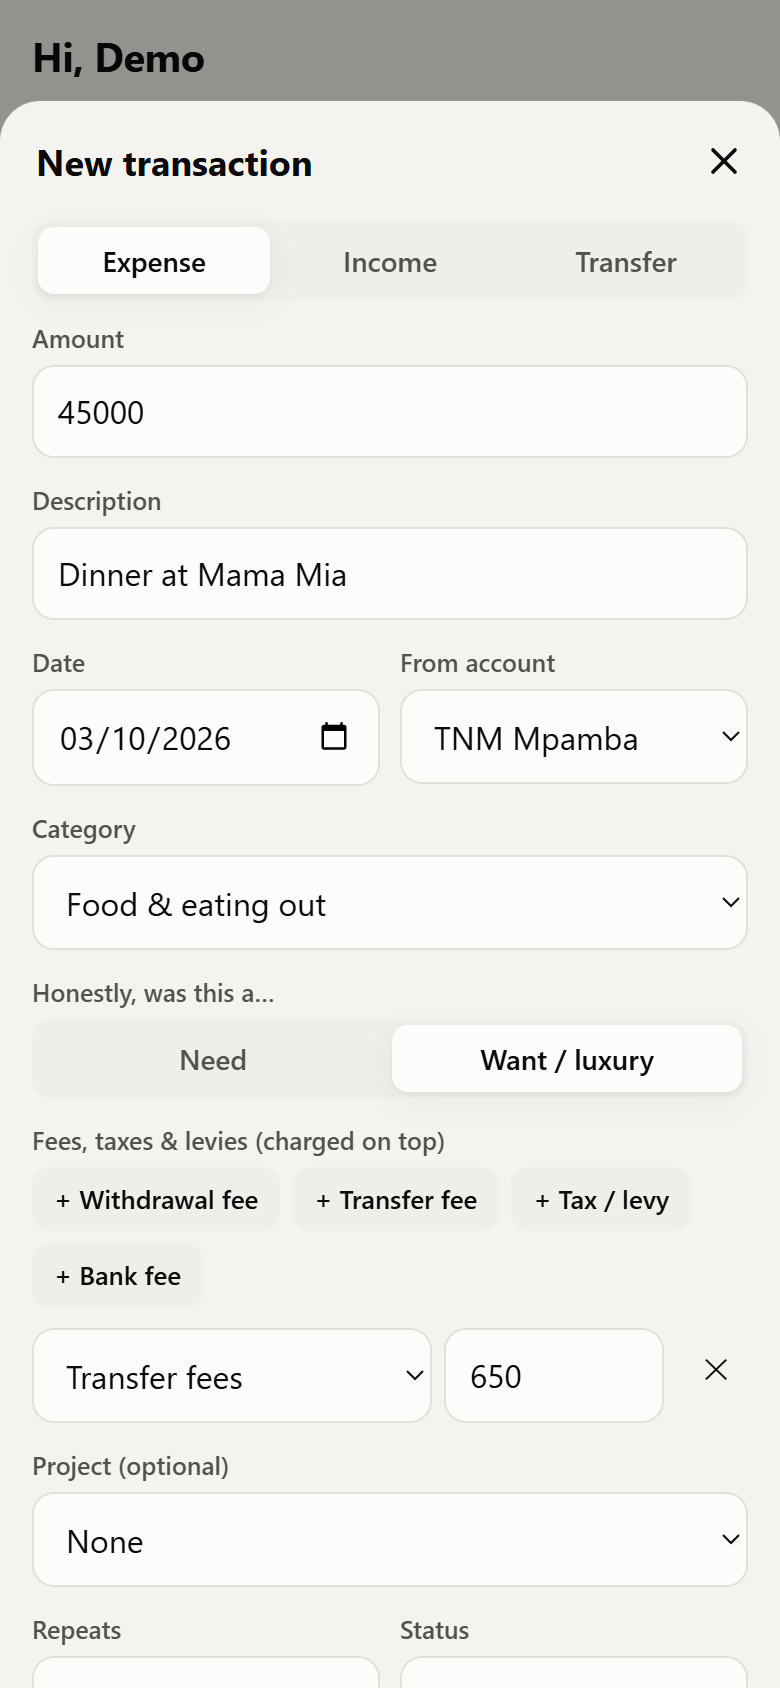
- + → Expense.
- Enter the amount, a description and the date; choose the account it was paid from and the category.
- Be honest: tap Need or Want / luxury.
- Add any charges with the quick buttons — + Withdrawal fee, + Transfer fee, + Tax / levy, + Bank fee — and enter the amounts. They're charged on top and each goes to its own total. The form shows the total leaving the account.
- Optionally link it to a project (and tick the project cost items it paid for).
- Leave Repeats on Once-off, or choose a frequency to make it a recurring item; set Status to Planned (estimate) to plan it without recording a payment yet.
- Tap Save.
4.2 Record income
+ → Income: amount, the account it was paid into, the category (Salary, Business/consulting…). Fees or deductions entered here are subtracted from what lands in the account.
4.3 Transfers, withdrawals and top-ups
Use + → Transfer whenever money moves between your own accounts — it is not income or spending.
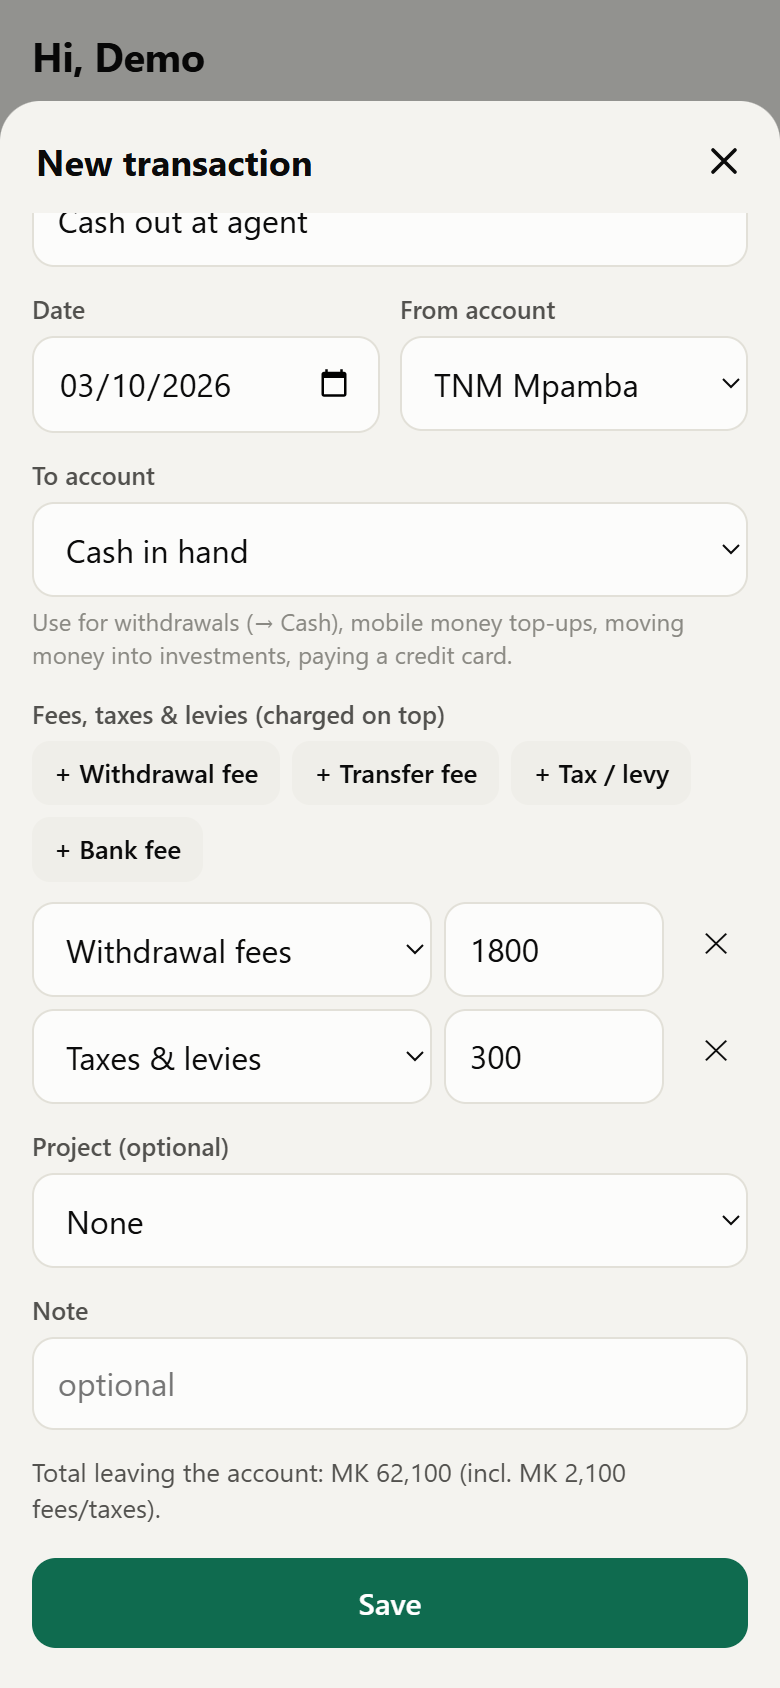
- Cash out at an agent: from your wallet to Cash in hand, with a withdrawal fee and the government levy.
- Mobile money top-up: from the bank to the wallet, with the transfer fee.
- Saving or investing: from the bank to your savings account or fixed deposit.
Only the fees count as spending; the rest just moves.
4.4 View, edit or delete a transaction
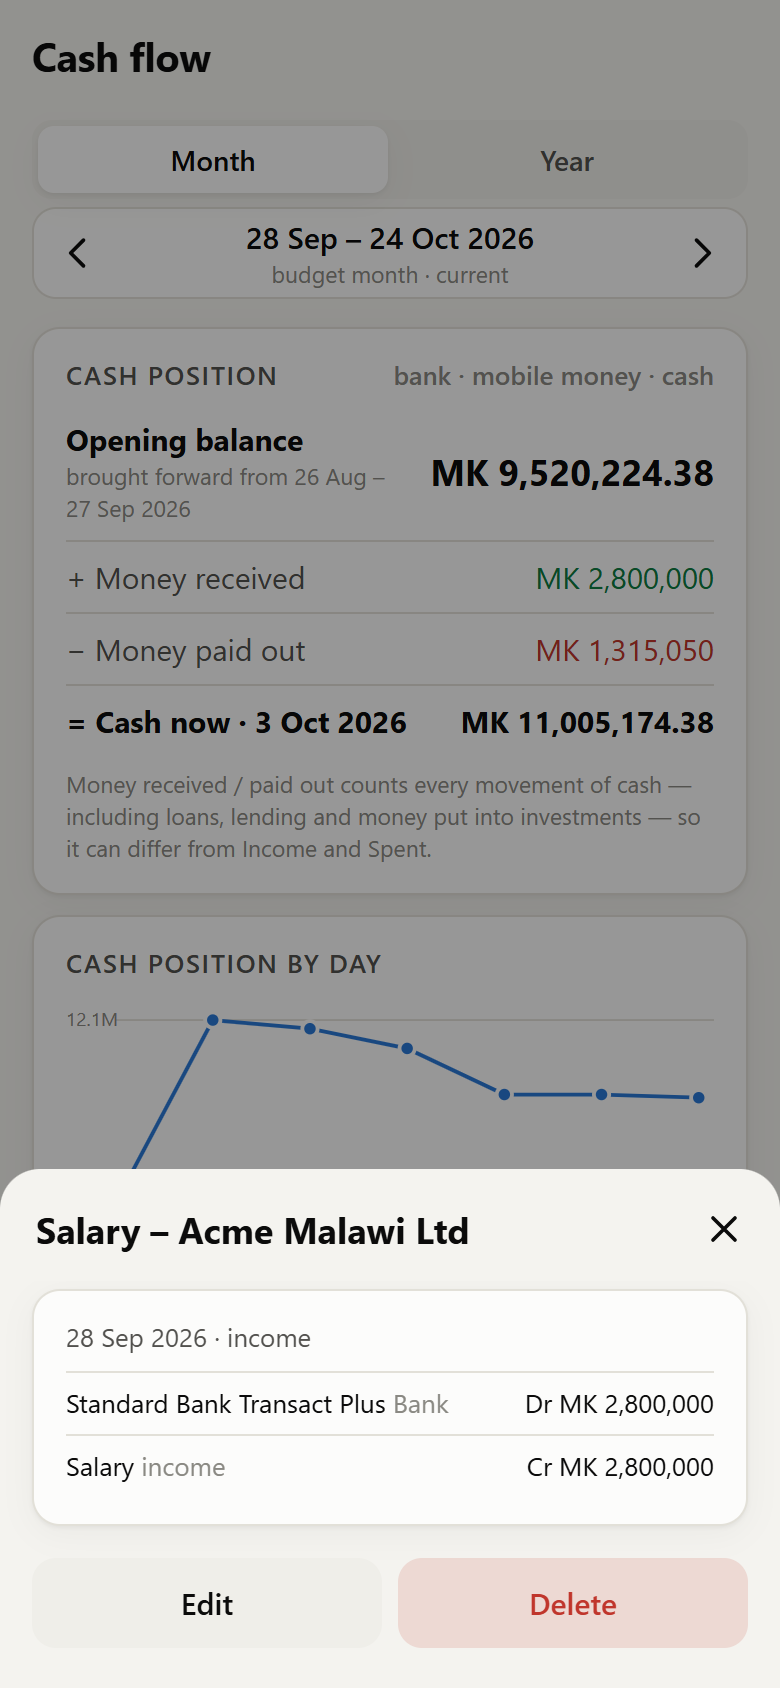
Tap any transaction to see its ledger lines (debits and credits), notes and the original SMS. Use Edit or Delete; deleting releases anything it was linked to (an expected item, project cost items).
5. SMS & statement import
5.1 Paste SMS alerts
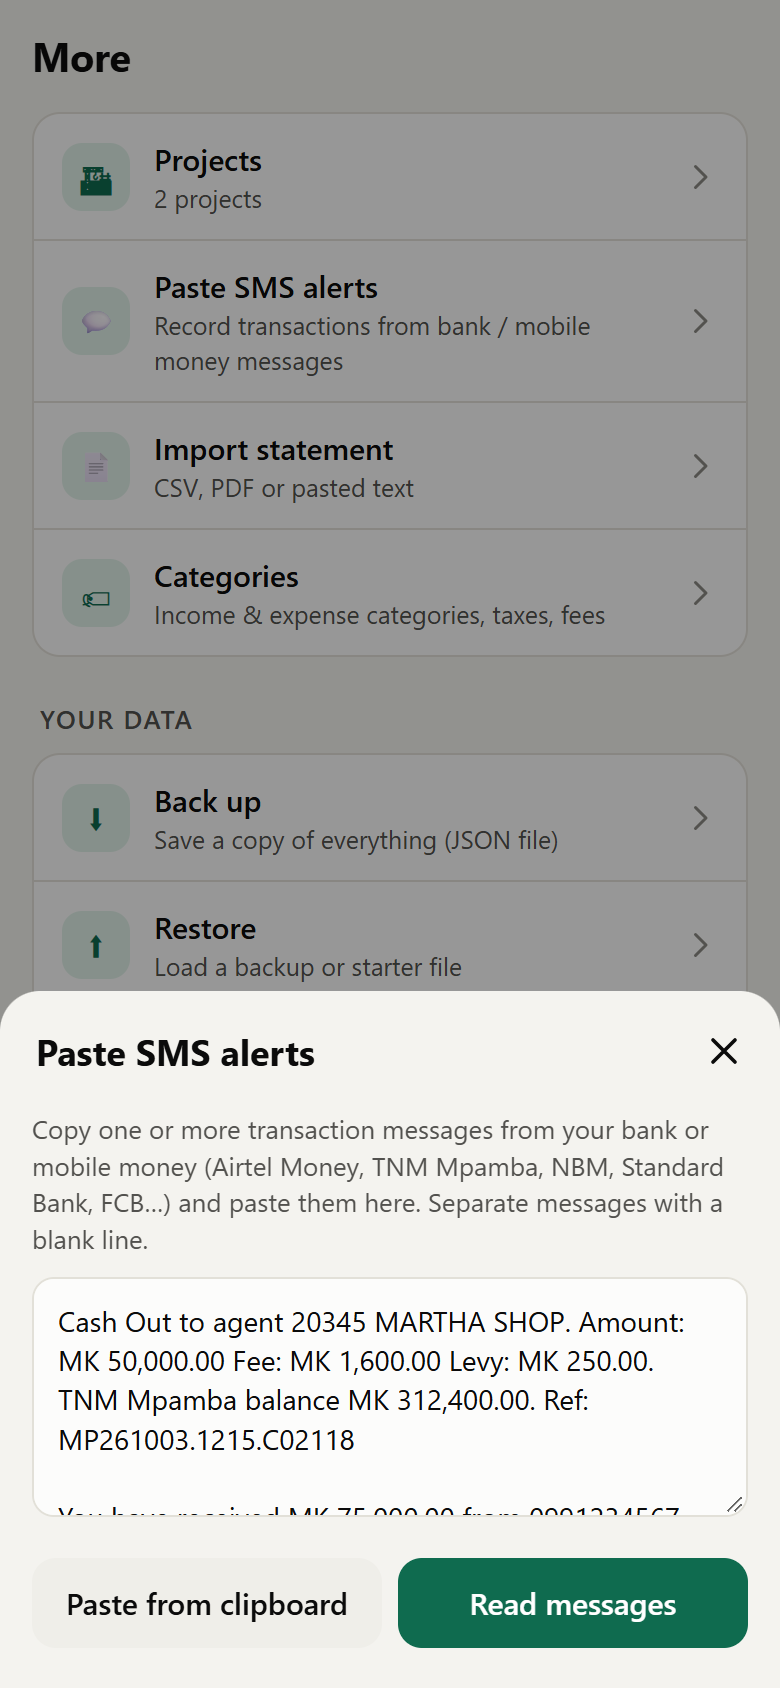
- In your messages app, copy one or more transaction alerts (Airtel Money, TNM Mpamba, NBM, Standard Bank, FCB…).
- + → Paste SMS (or More → Paste SMS alerts). Paste them; separate messages with a blank line.
- Tap Read messages.
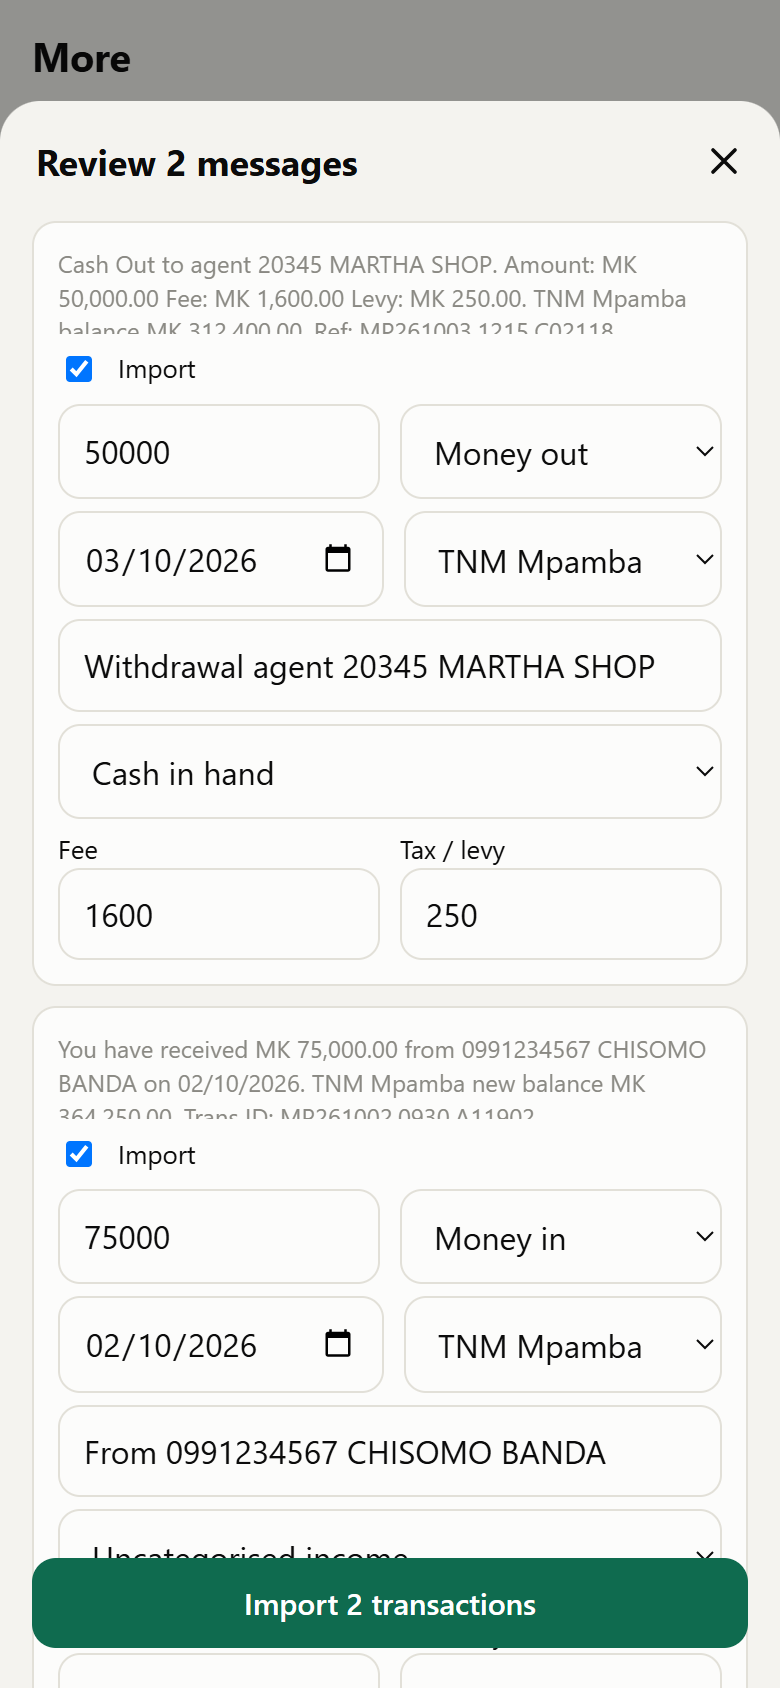
- Review each card: amount, money in/out, date, account, description and category. Fees and levies found in the message are already filled in. Cash-outs become transfers to Cash in hand.
- Untick anything you don't want. A possible duplicate label means a matching transaction already exists.
- Tap Import.
5.2 Import a bank statement
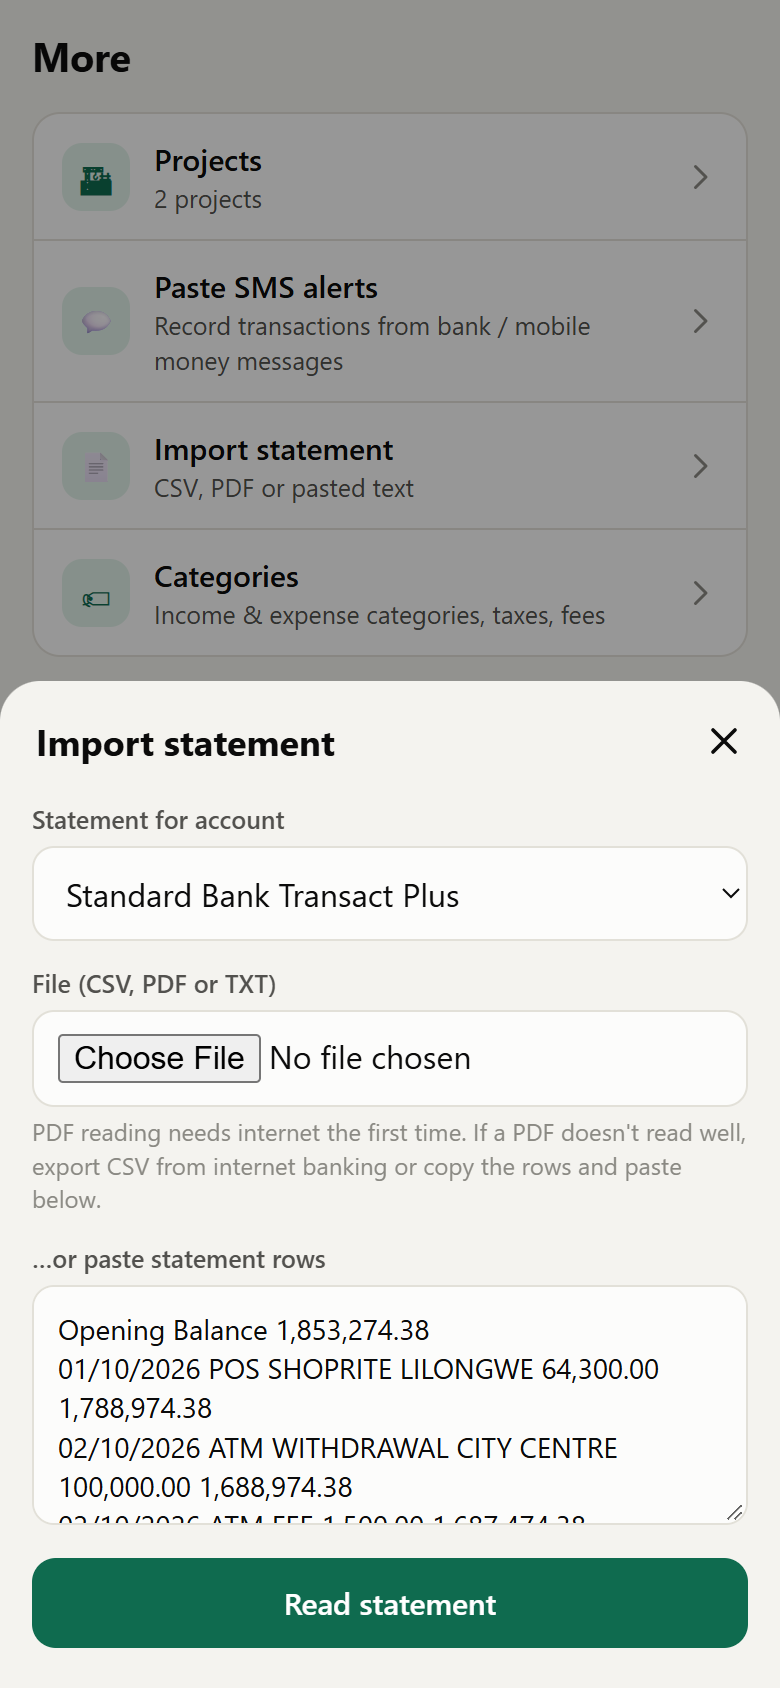
- + → Statement. Choose the account the statement belongs to.
- Pick a CSV, PDF or TXT file, or paste the statement rows.
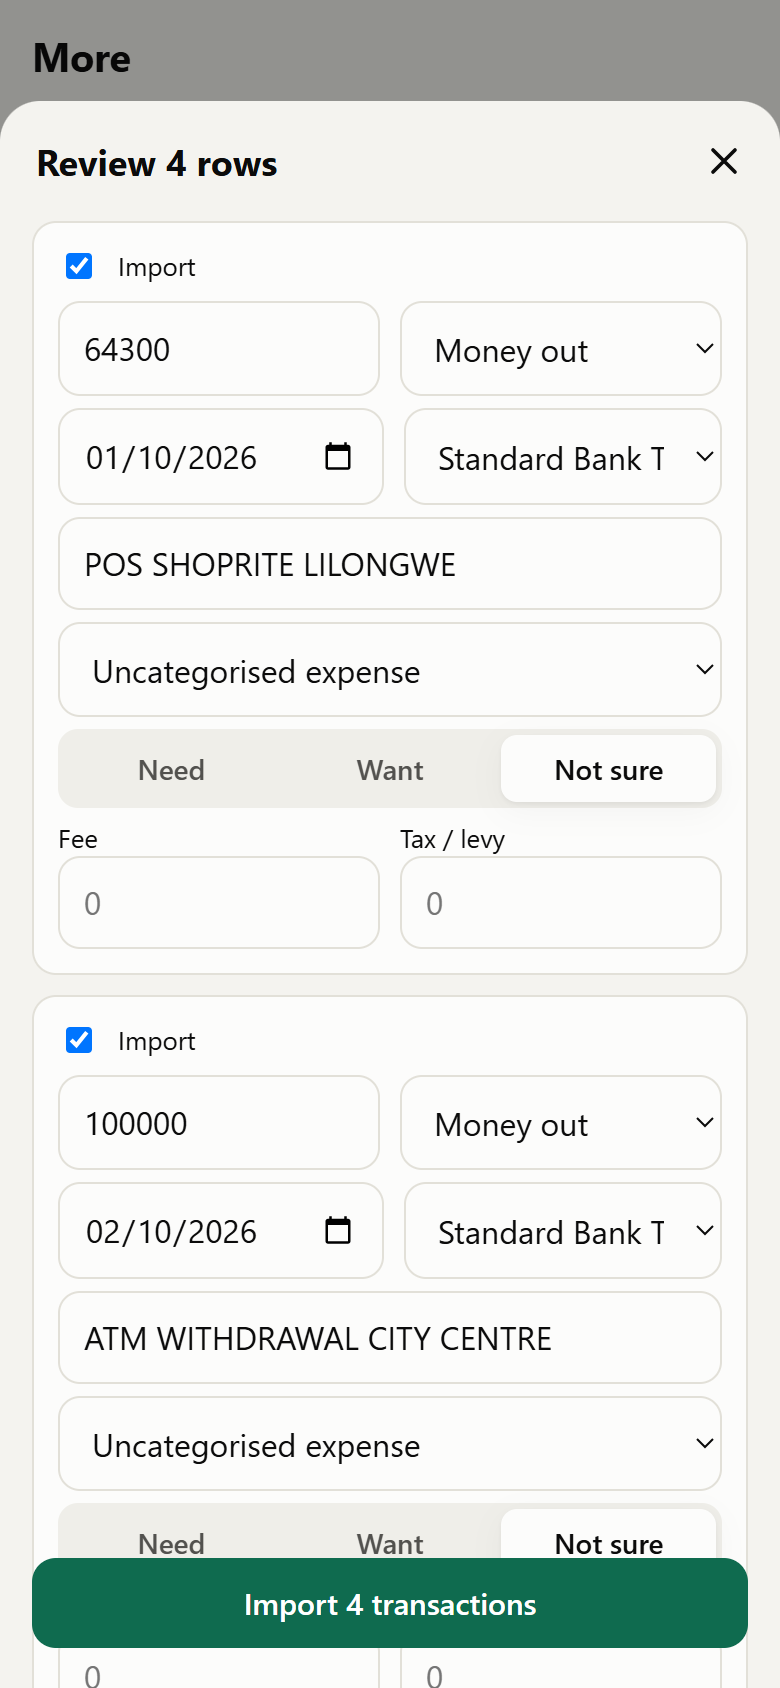
- Tap Read statement. The app works out money in vs out from the running balance and flags bank charges and taxes (ledger fees, excise duty…) automatically.
- Choose categories (or “Transfer to/from my account” for movements between your accounts), mark needs/wants, and import.
6. Cash flow & planning
6.1 The Cash flow page
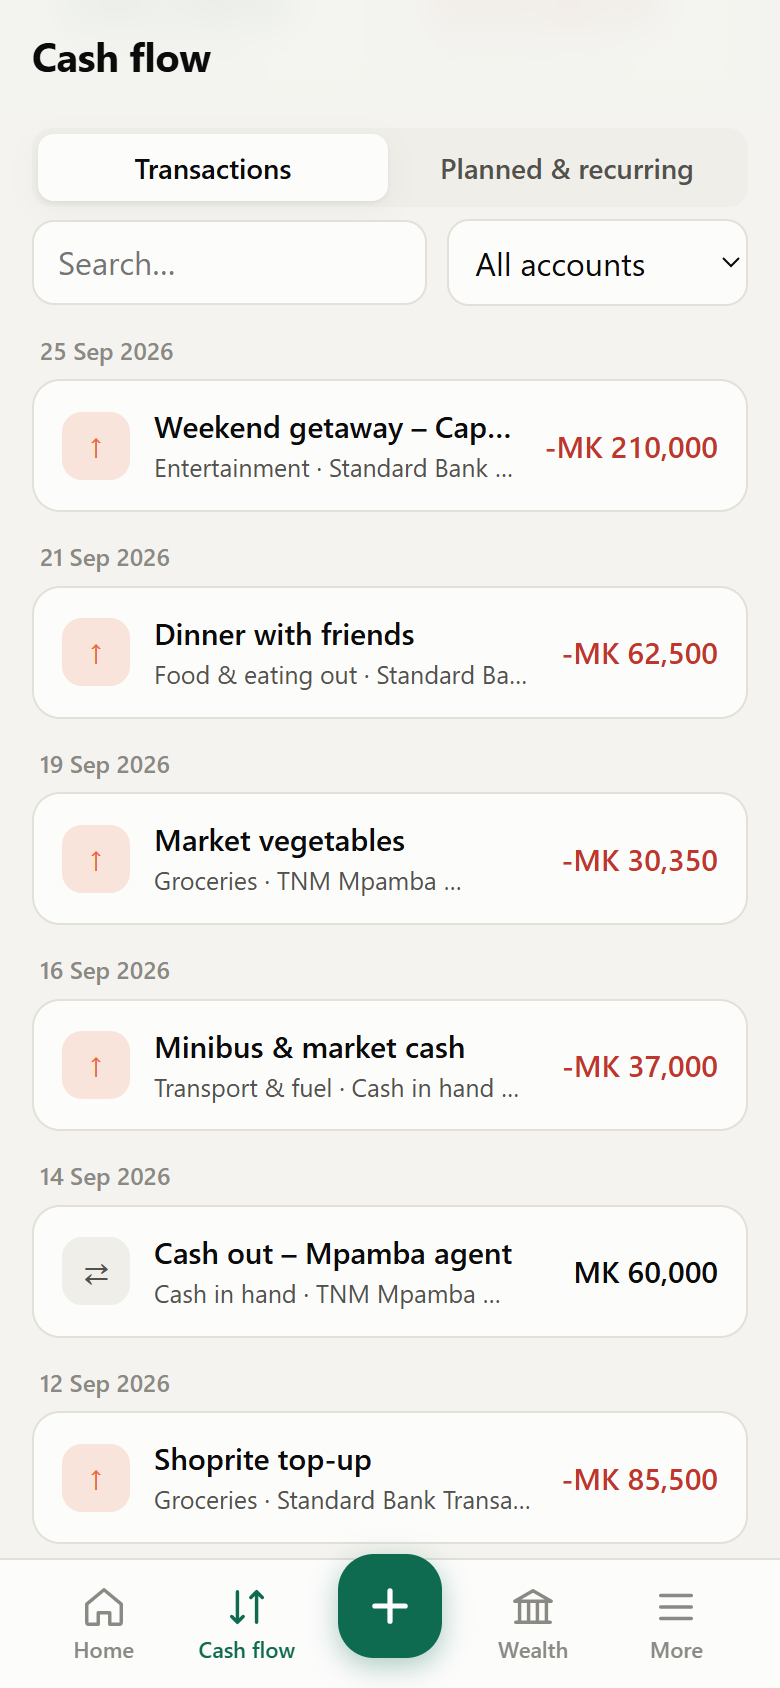
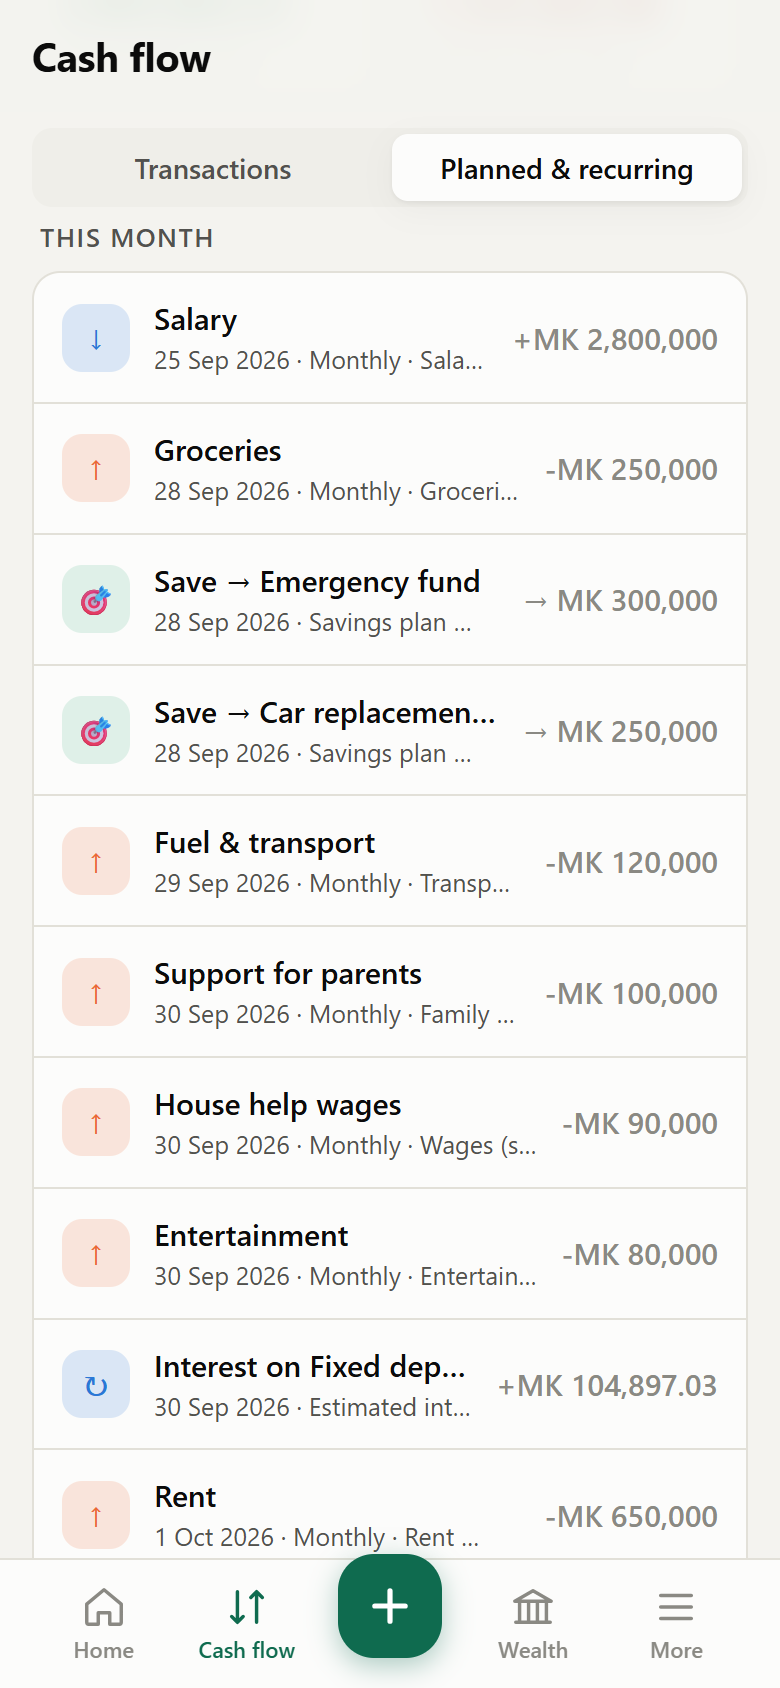
Shows the cash position for the period, a line chart of your cash (per day in month view, per month in year view — the balance at the end of each past month and today's balance for the current one), income and spending against plan, and two tabs:
- Transactions — searchable and filterable by account.
- Planned & recurring — this period's expected items and the list of all your recurring/planned items.
6.2 Planned & recurring items
- Cash flow → Planned & recurring → + Add (or + → Planned / recurring).
- Choose Expense or Income, a name, the estimated amount, category and account.
- Set how often it repeats (once, weekly, every 2 weeks, monthly, quarterly, yearly), the first date and an optional end date; mark need or want.
- Save. Each occurrence now shows as expected.
6.3 Confirming the actual
When an expected item happens, tap it (on Home → Due & expected or in Cash flow). The form opens pre-filled with the estimate — enter what actually happened and save. You can also Skip an occurrence. Recorded items count in the budget month in which they actually happened.
- Already recorded it? If the payment came in by SMS or statement, the form shows Already recorded? with the most likely transaction. Tap Link instead of entering it twice.
- Automatic matching. When you record or import an income or expense, it's counted against the expected item of the same category if one is within 20 days and the amount is 50–150% of the estimate.
- Match them. If earlier transactions weren't linked, Home → Due & expected says how many expected items look already paid. One tap on Match them links them all.
7. Budget month & rollover
If your money life runs from pay day to pay day, set your budget month to match. Budgets (water, electricity…) then accumulate through the pay cycle and reset at rollover; Income/Spent, budget vs actual, the cash position and the savings averages all follow it.
- More → Settings → My budget month runs:
- Calendar month — 1st to month end.
- From my pay day — roll over automatically — e.g. the 25th to the 24th.
- From my pay day — I roll over manually — the month stays open until you roll over. Best when the salary date varies.
- Enter the pay day (e.g. 25) and save.
Rolling over manually
- From your pay day, Home shows New budget month due. If the salary hasn't arrived, tap Not yet — spending keeps counting towards the current month.
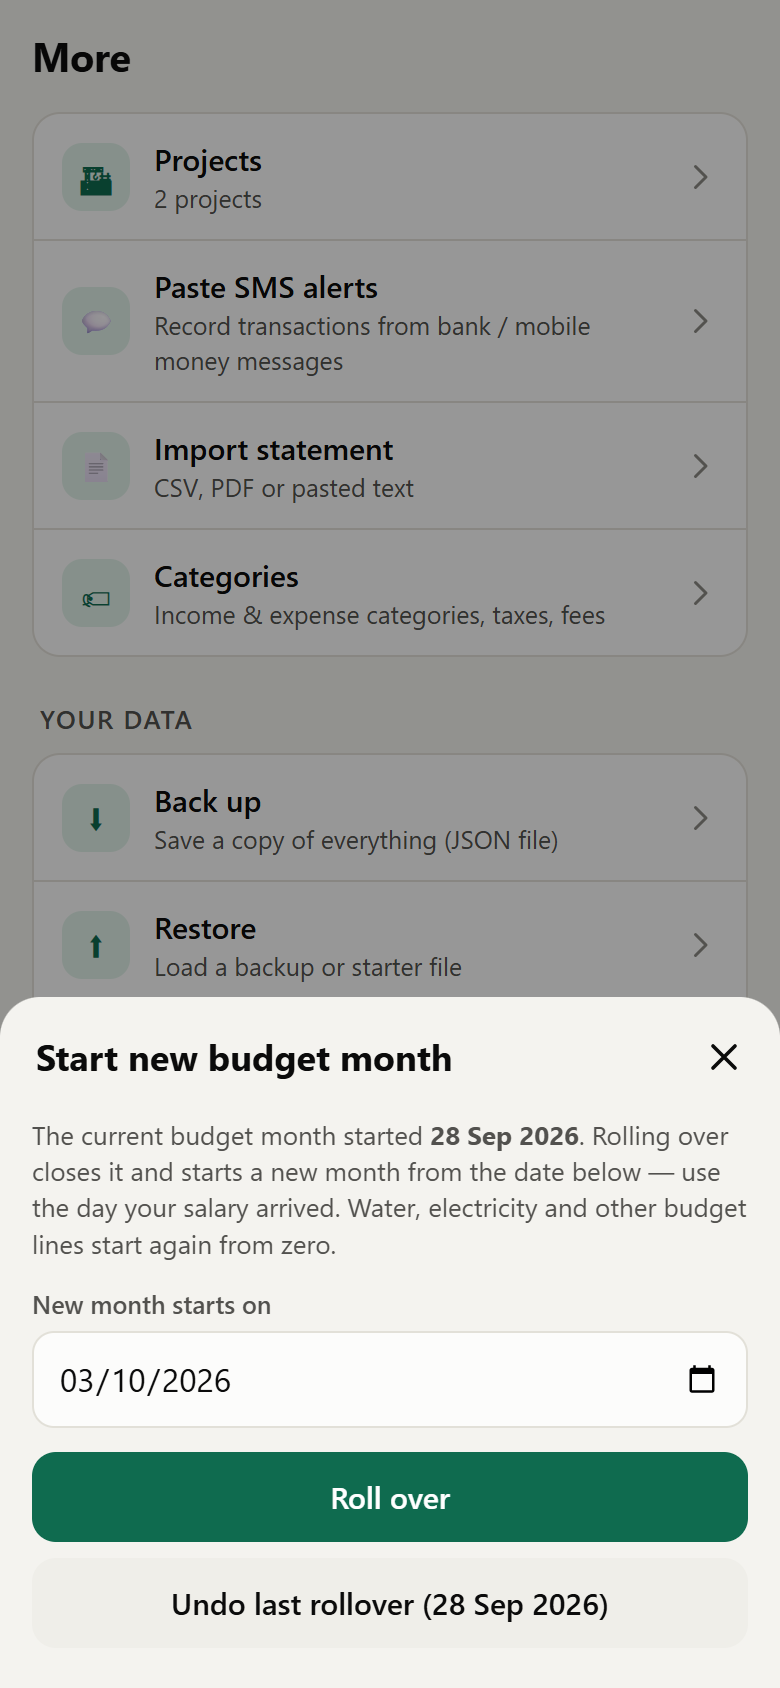
- When the salary lands, tap Roll over now (or More → Start new budget month).
- Pick the date the salary arrived and tap Roll over. Made a mistake? Undo last rollover.
8. Wealth: accounts & assets
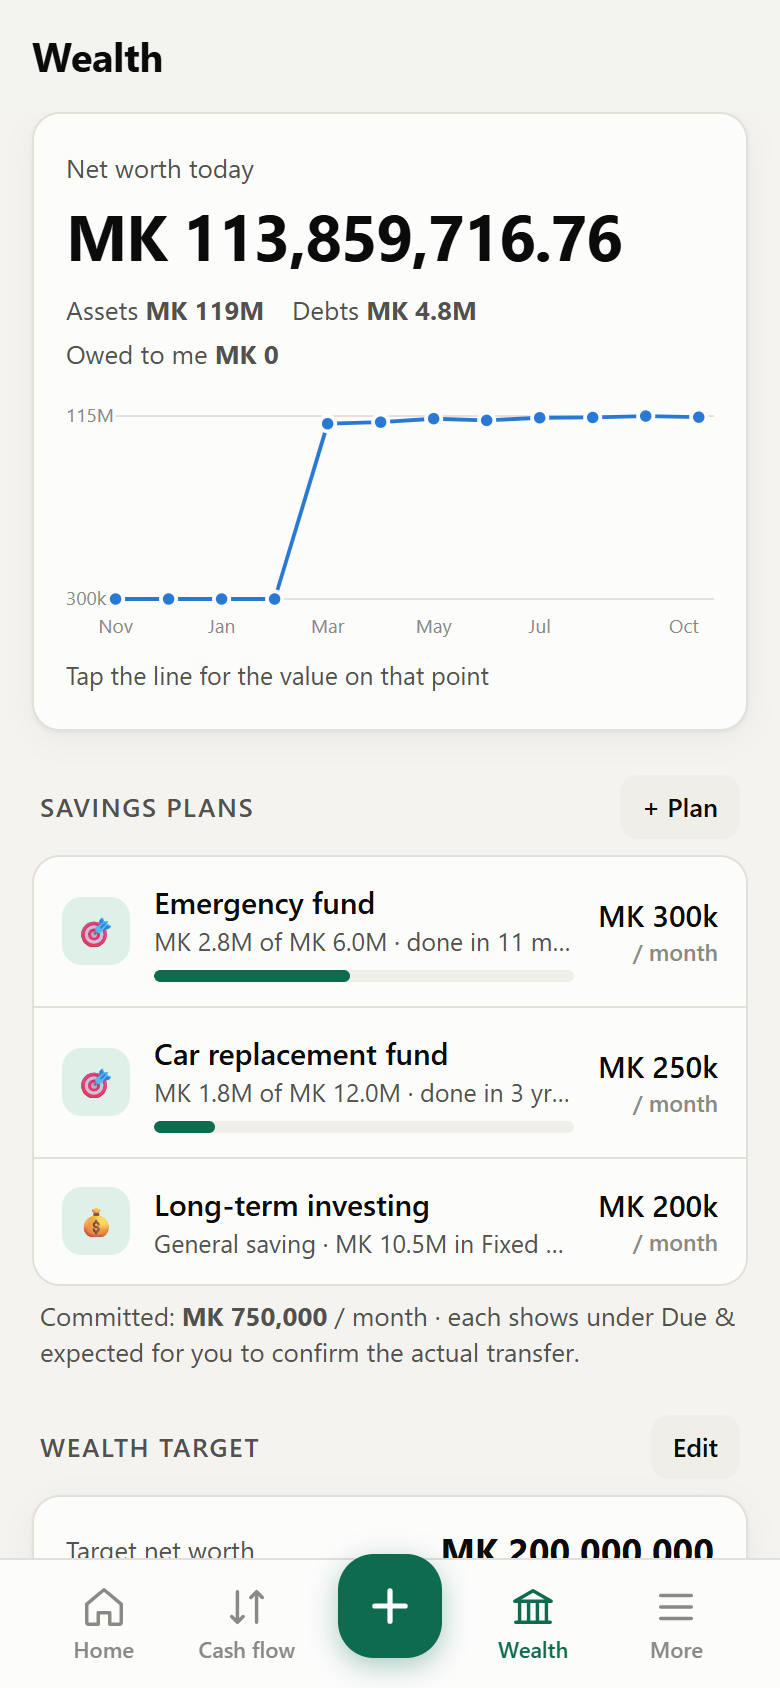
The Wealth page shows your net worth and its 12-month trend, your savings plans and wealth target, and every account grouped as: bank, mobile money & cash · investments & assets · money I lent · money I owe.
8.1 Account screen and balance checks
Tap an account for its balance and transactions. Set balance lets you enter what the bank or wallet actually shows; any difference is recorded honestly as unrecorded spending or unrecorded income.
8.2 Overdrafts
- Open the bank account → Edit → enter the Overdraft limit → Save.
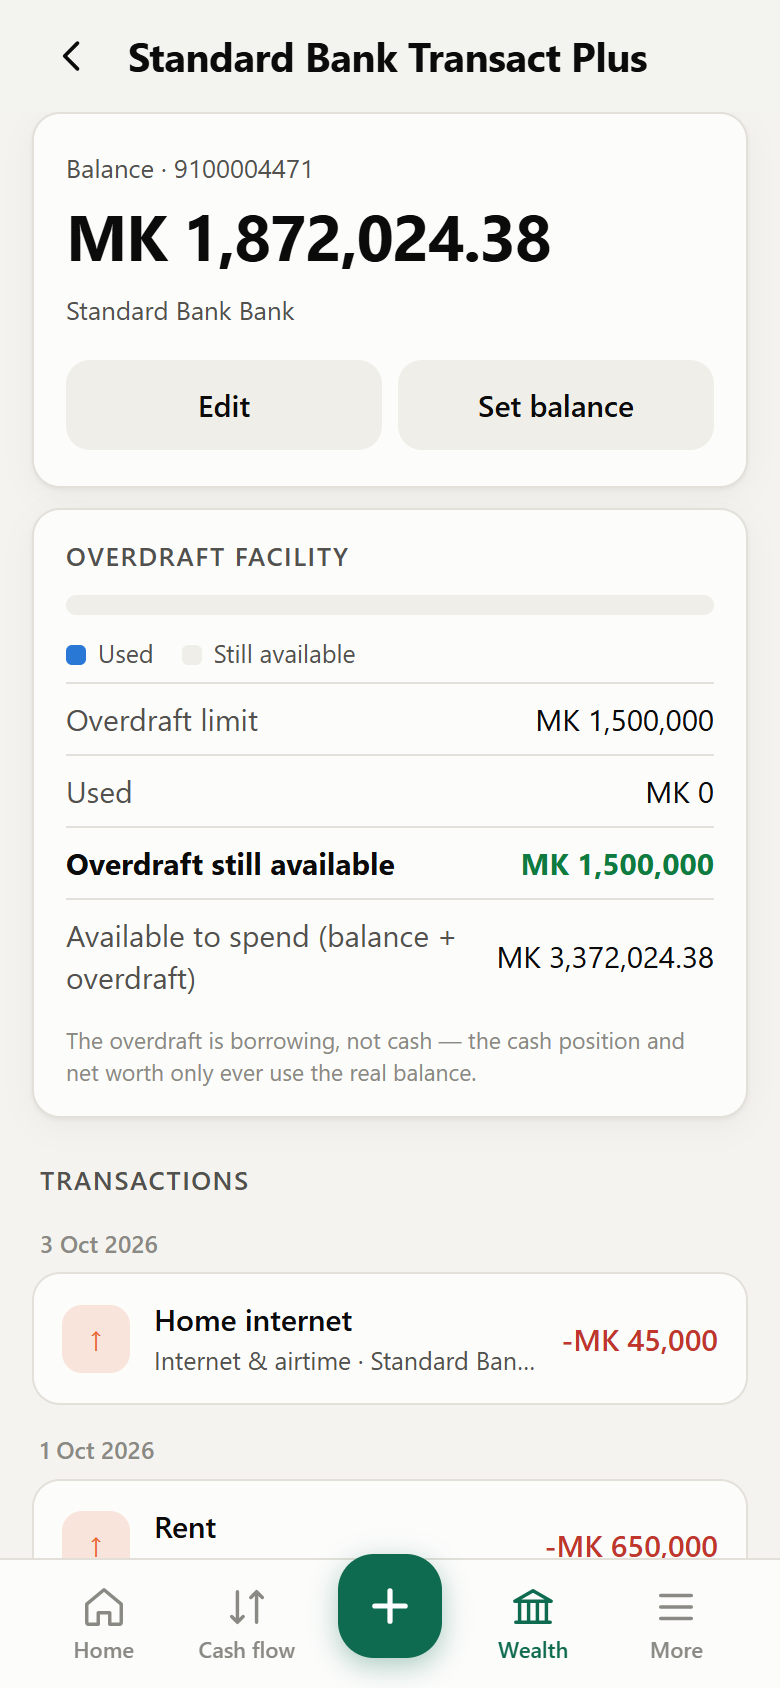
- The balance may go negative. The account screen shows the Overdraft facility: limit, used, still available, and available to spend (balance + overdraft). Lists show “MK … overdraft available” or a red “over overdraft limit”.
The overdraft is borrowing, not cash: the cash position and net worth always use the real balance.
8.3 Investments and assets
- Wealth → + Investment. Choose the kind: shares, unit trust, fixed asset (house, land, vehicle), savings / fixed deposit, pension, other.
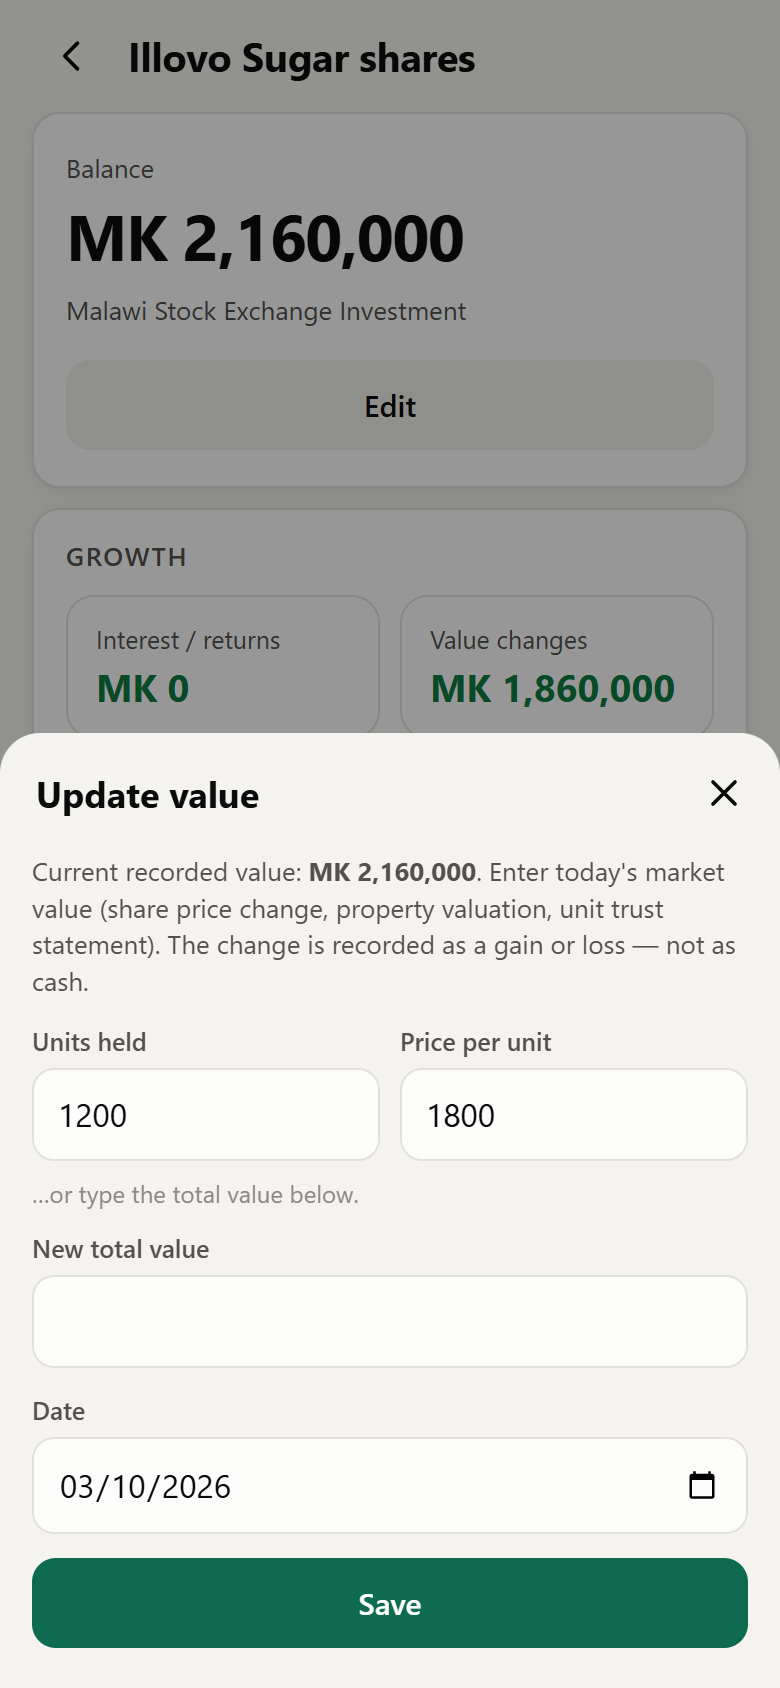
- Enter the current value and date. For interest-earning investments enter the return % p.a. and keep Expect interest monthly ticked; for shares enter units and price per unit.
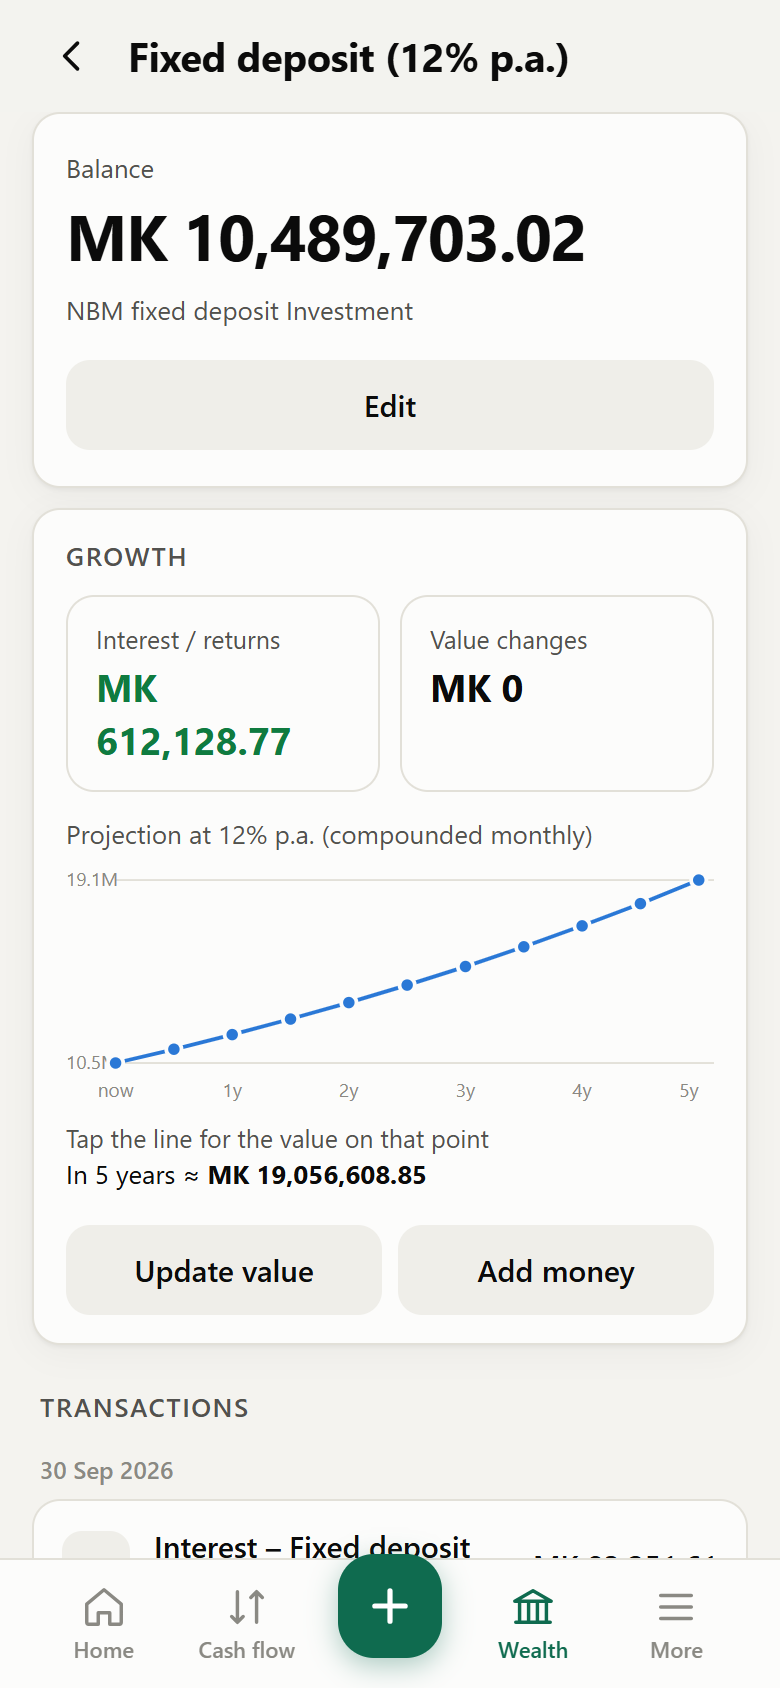
- Interest: each month an estimated interest item appears in Due & expected, based on the average balance you held that month. Tap it and enter the gross interest and the withholding tax from your statement (20% WHT fills in 20%). The net amount is reinvested into the investment and the tax is added to Taxes & levies. The app remembers the tax rate for next month's estimate.
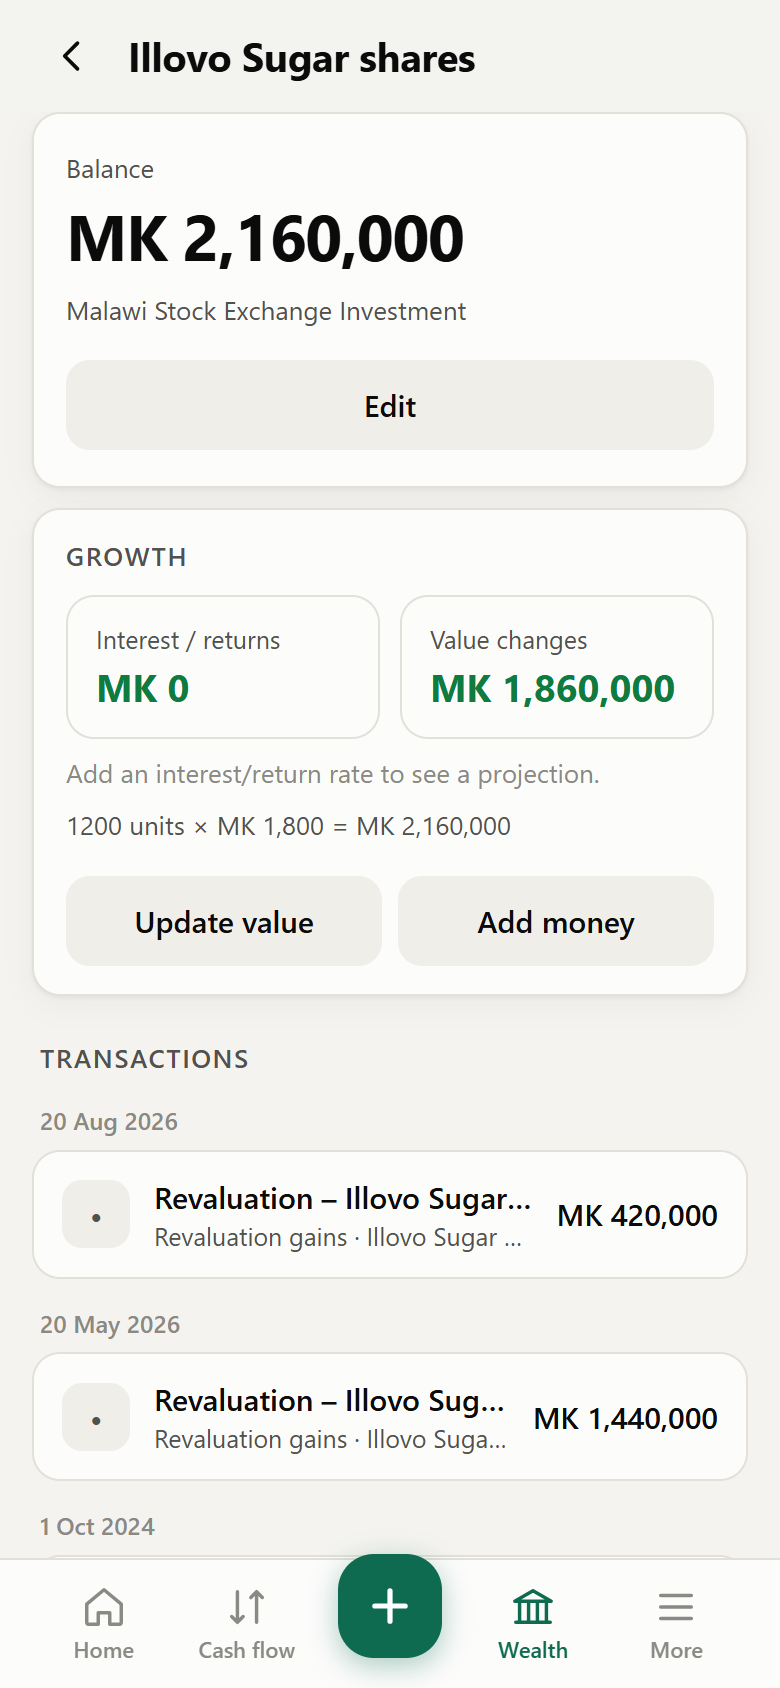
- Value changes: tap Update value, enter the new share price (or total value). The difference is recorded as a revaluation gain or loss — not as cash.
- The investment screen shows interest earned, value changes and a 5-year projection.
9. Loans & lending
9.1 Add a loan
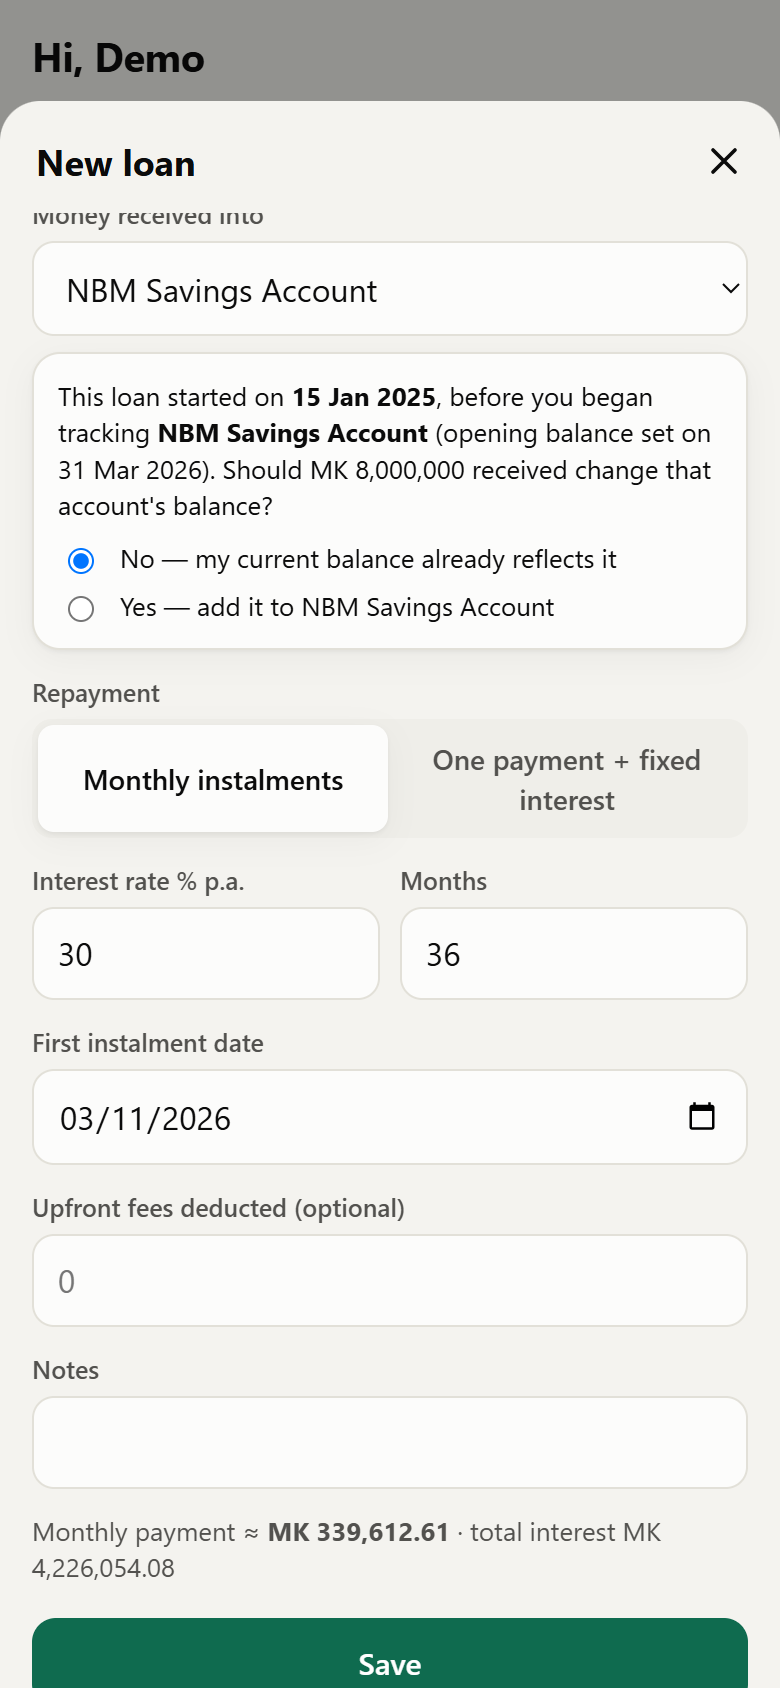
- + → Loan (or Wealth → + Loan). Choose I borrowed or I lent.
- Enter the lender/borrower, amount, date and the account the money went into (or came from).
- Repayment:
- Monthly instalments (banks): interest % p.a., number of months and first instalment date. The app builds an amortisation schedule and predicts each payment.
- One payment + fixed interest (individuals): repayment date and interest as a % or a fixed amount.
- Optionally enter upfront fees deducted. Save.
9.2 The loan screen
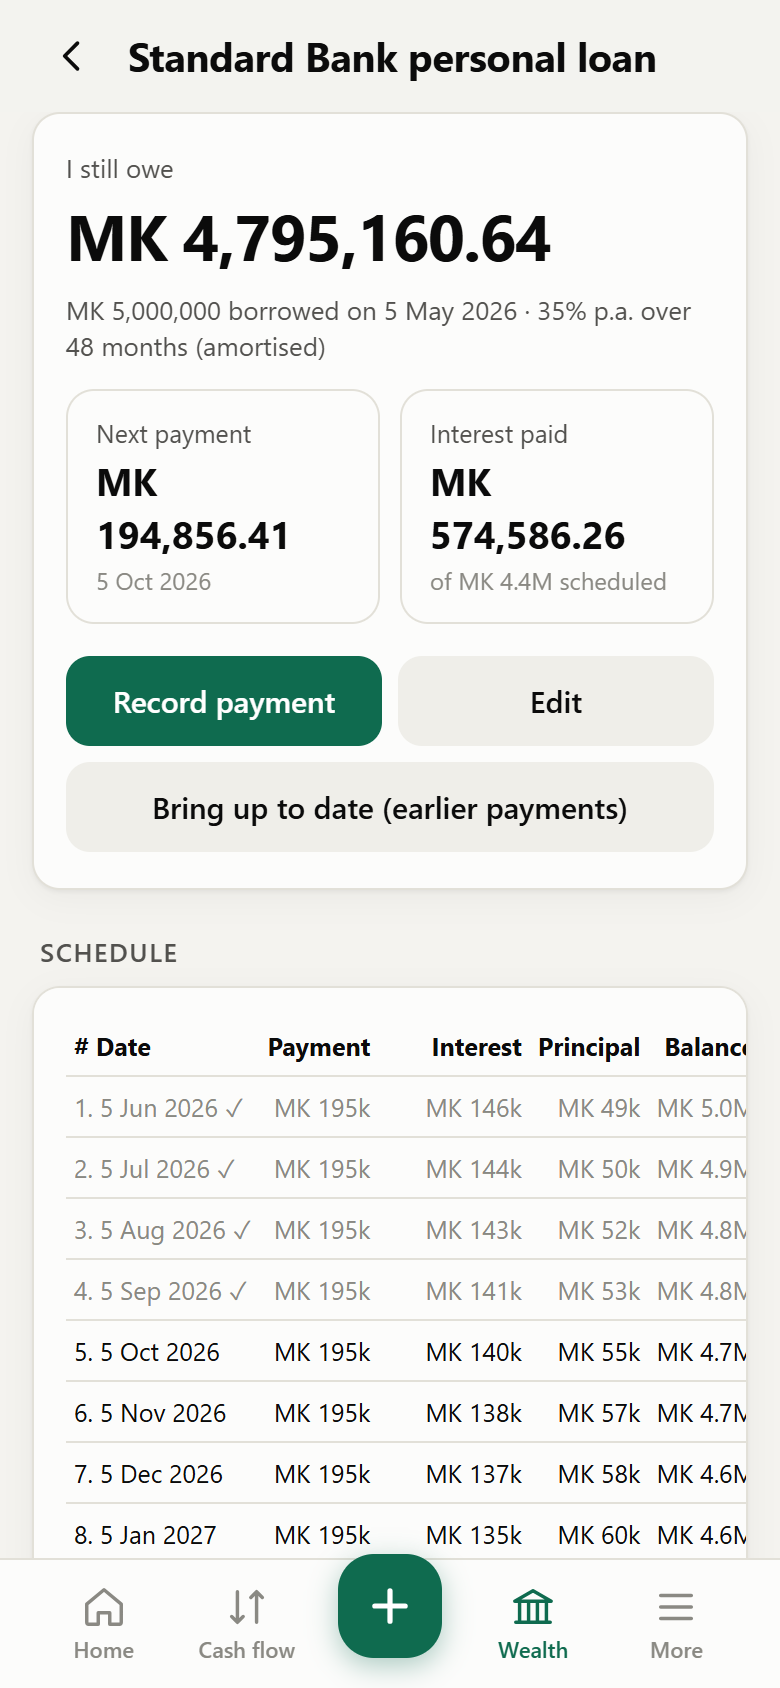
Shows what's still owed, the next payment, interest paid so far and the full schedule (✓ = paid).
9.3 Record a payment
- Tap Record payment (or the instalment in Due & expected).
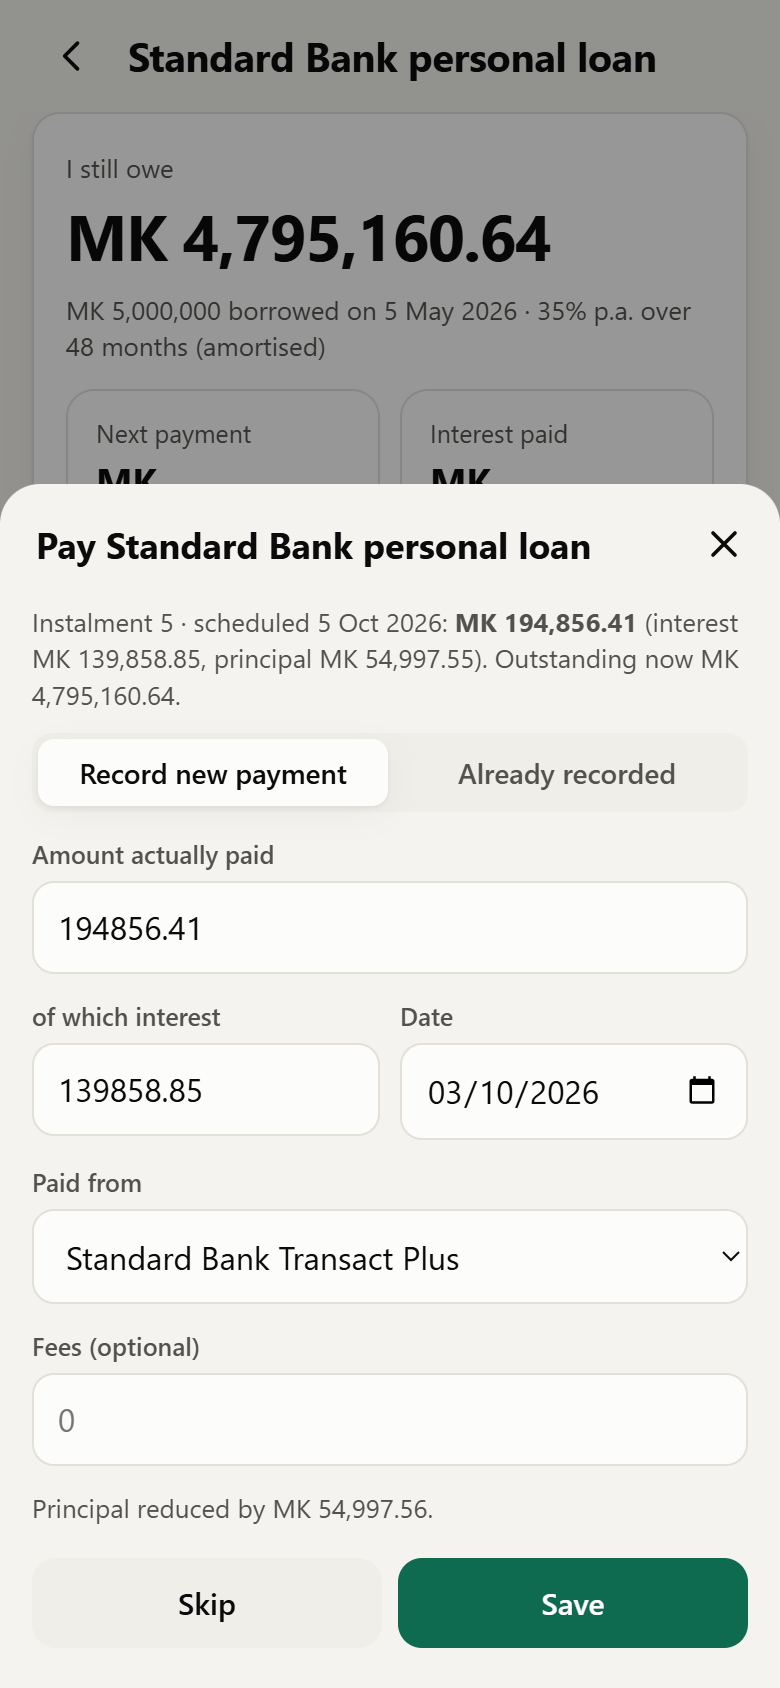
- Record new payment: confirm the amount actually paid, the interest part, the date and the account. The principal is reduced by the rest.
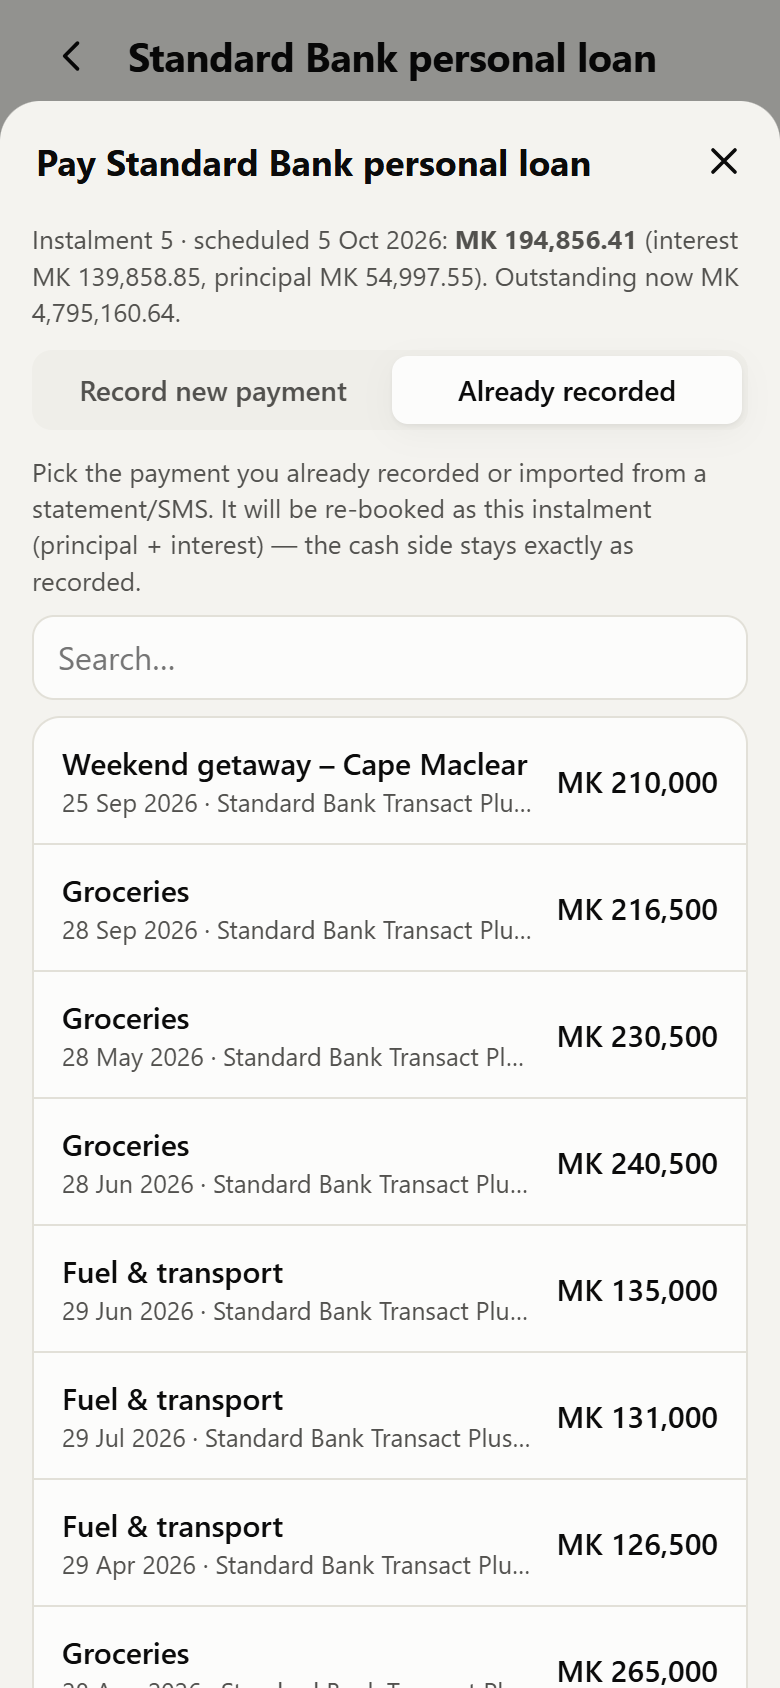
- Already recorded: if the payment is already in the app (e.g. imported from a statement), pick it from the list (closest amounts first). It's re-booked as the instalment — split into principal and interest — without changing the cash side.
9.4 Bring an older loan up to date
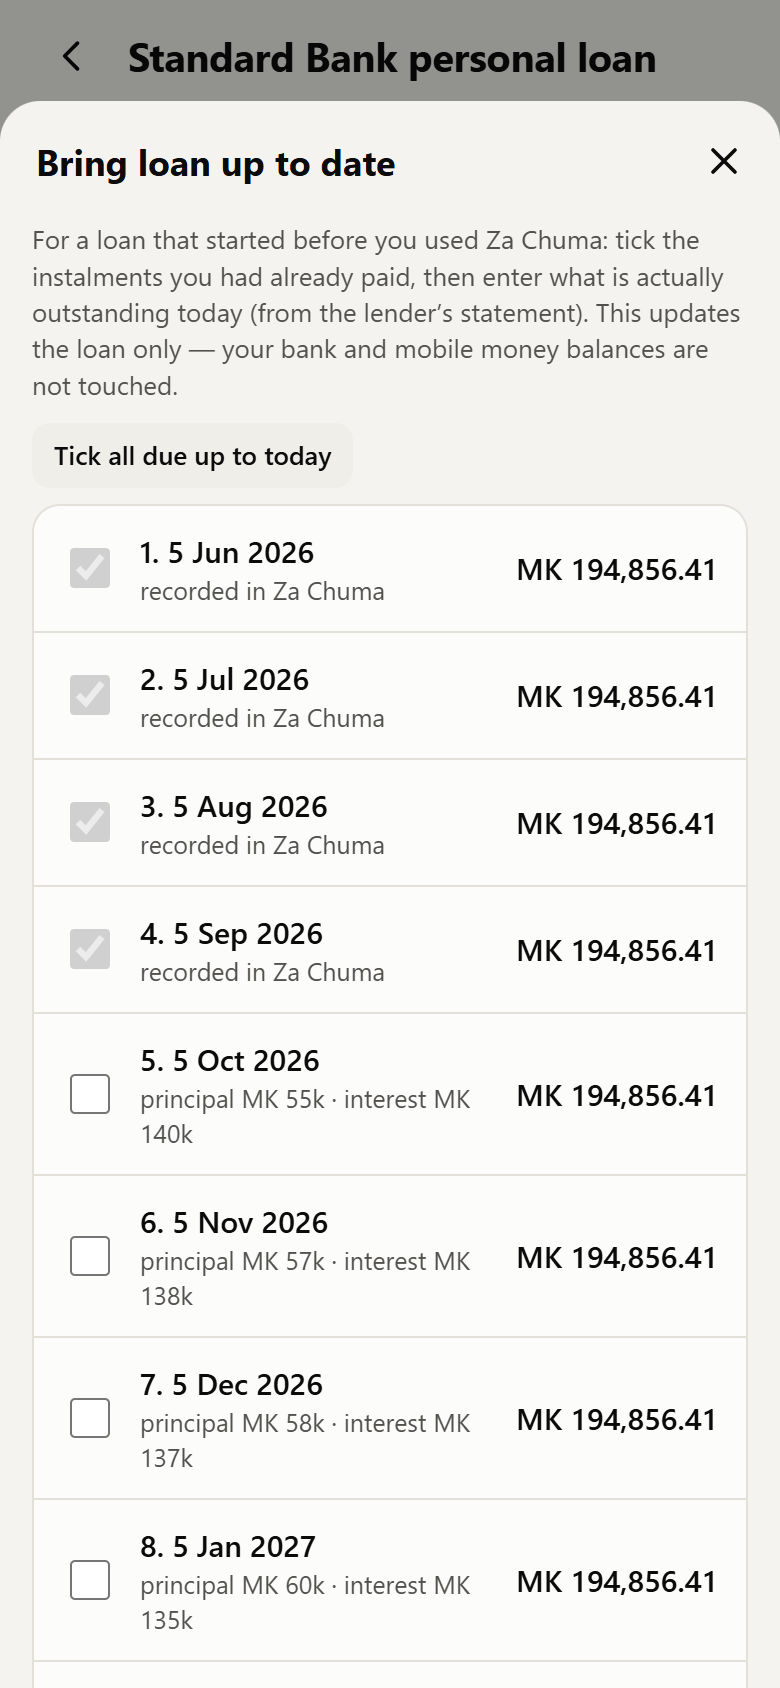
- On the loan screen tap Bring up to date (earlier payments).
- Tick the instalments you paid before using the app (or Tick all due up to today).
- Enter the actual outstanding from your statement and save. Only the loan changes — your bank balances aren't touched.
9.5 Money you lend
Lending moves money out to a “money owed to me” asset, so your net worth stays true while the cash flow shows the outflow. When the borrower repays, record the receipt: the principal comes back and the interest counts as income.
10. Projects
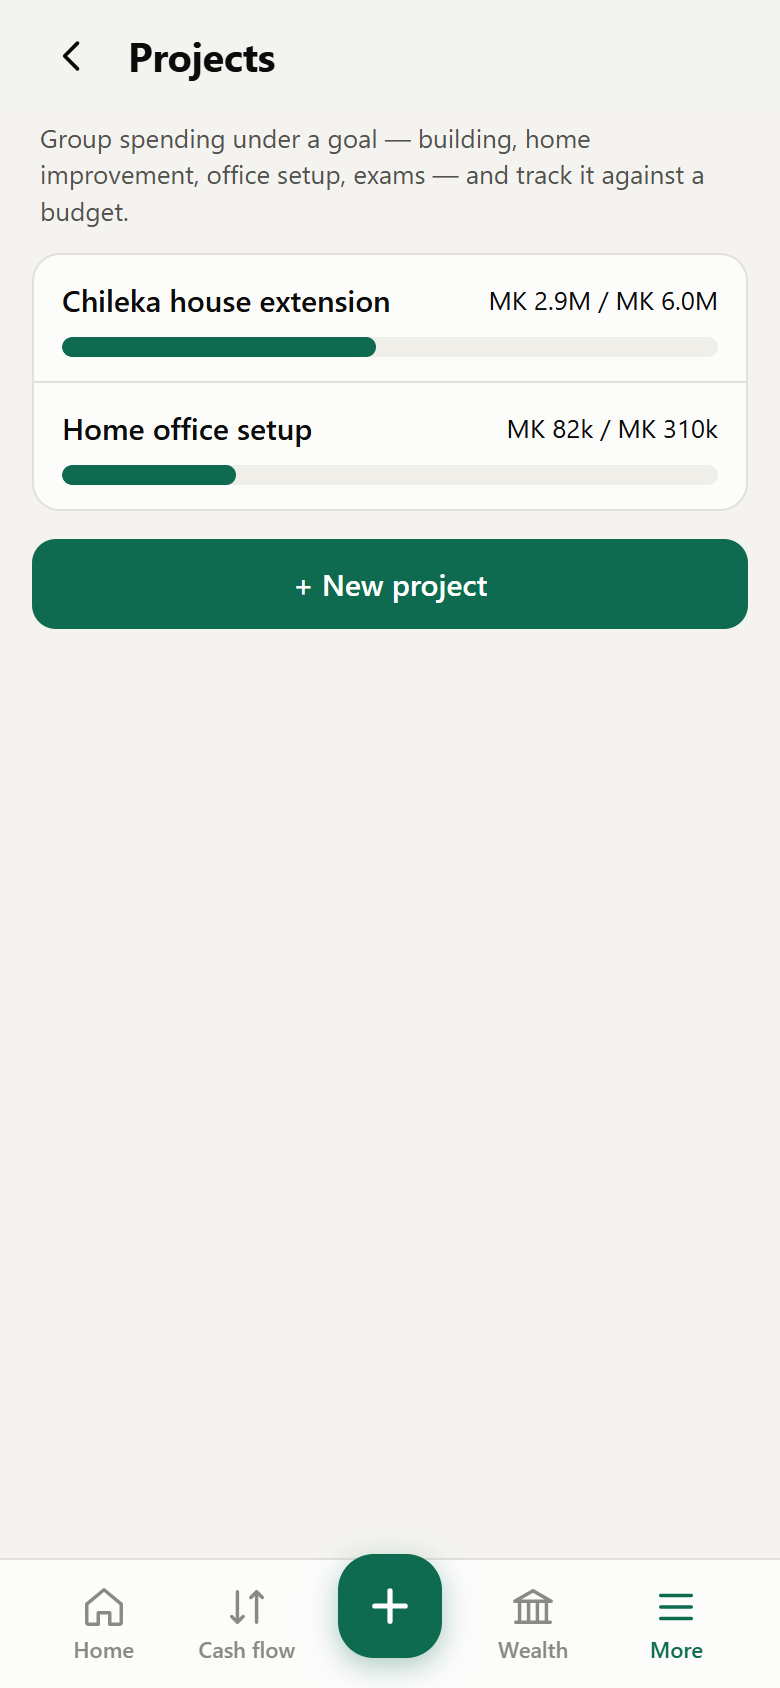
Group spending under a goal — building, home improvement, office setup, exams — and track it against a budget.
- More → Projects → + New project. Give it a name and an optional total budget.
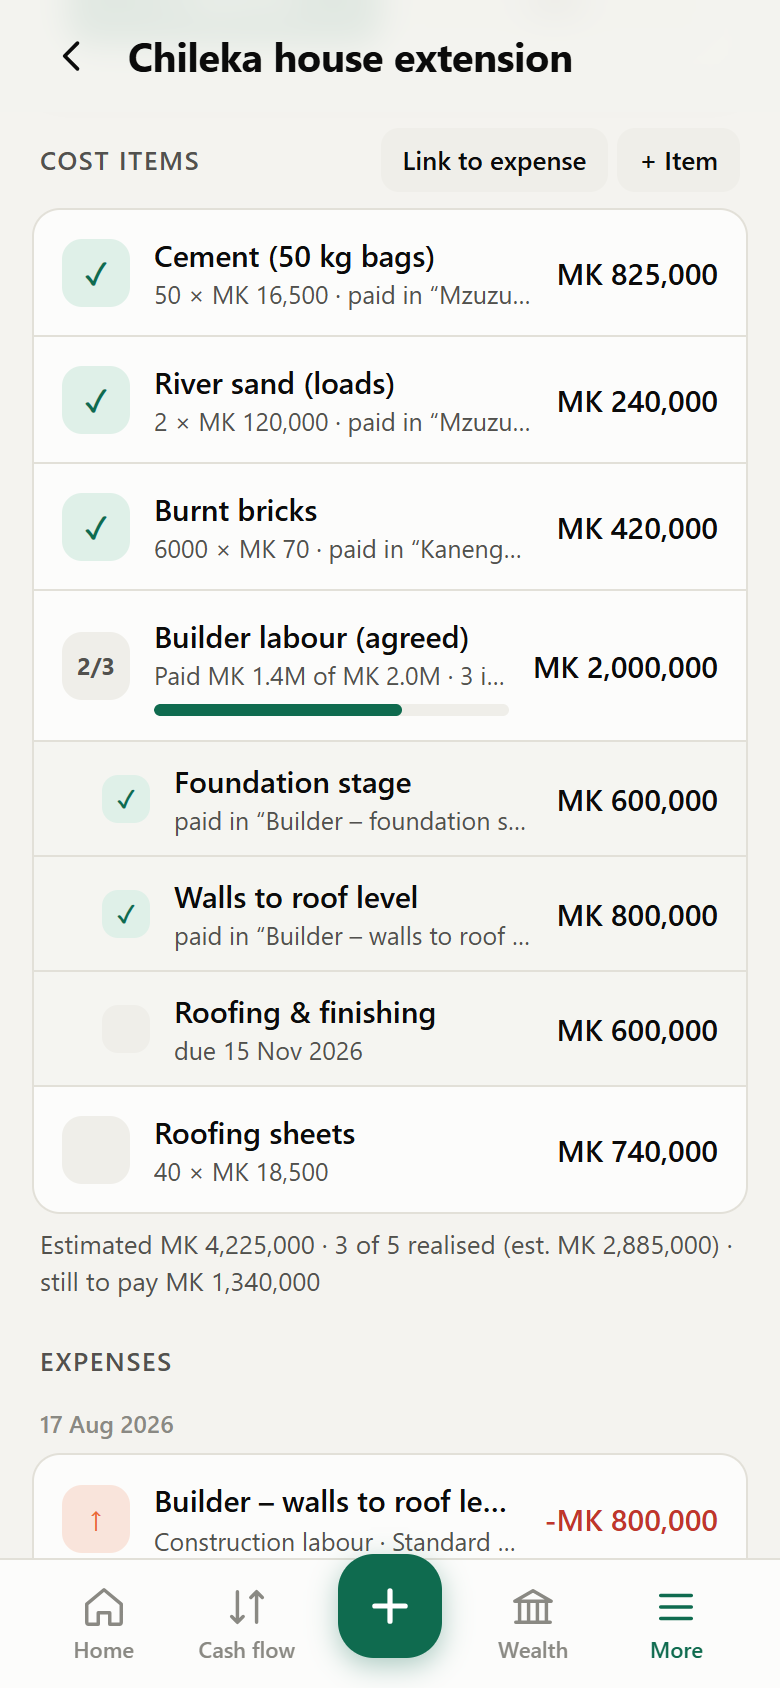
- Add cost items (+ Item): name, quantity and estimated unit price.
- When you buy an item, open it and tap Record actual purchase — or Link to an expense already recorded.
10.1 One payment for several items
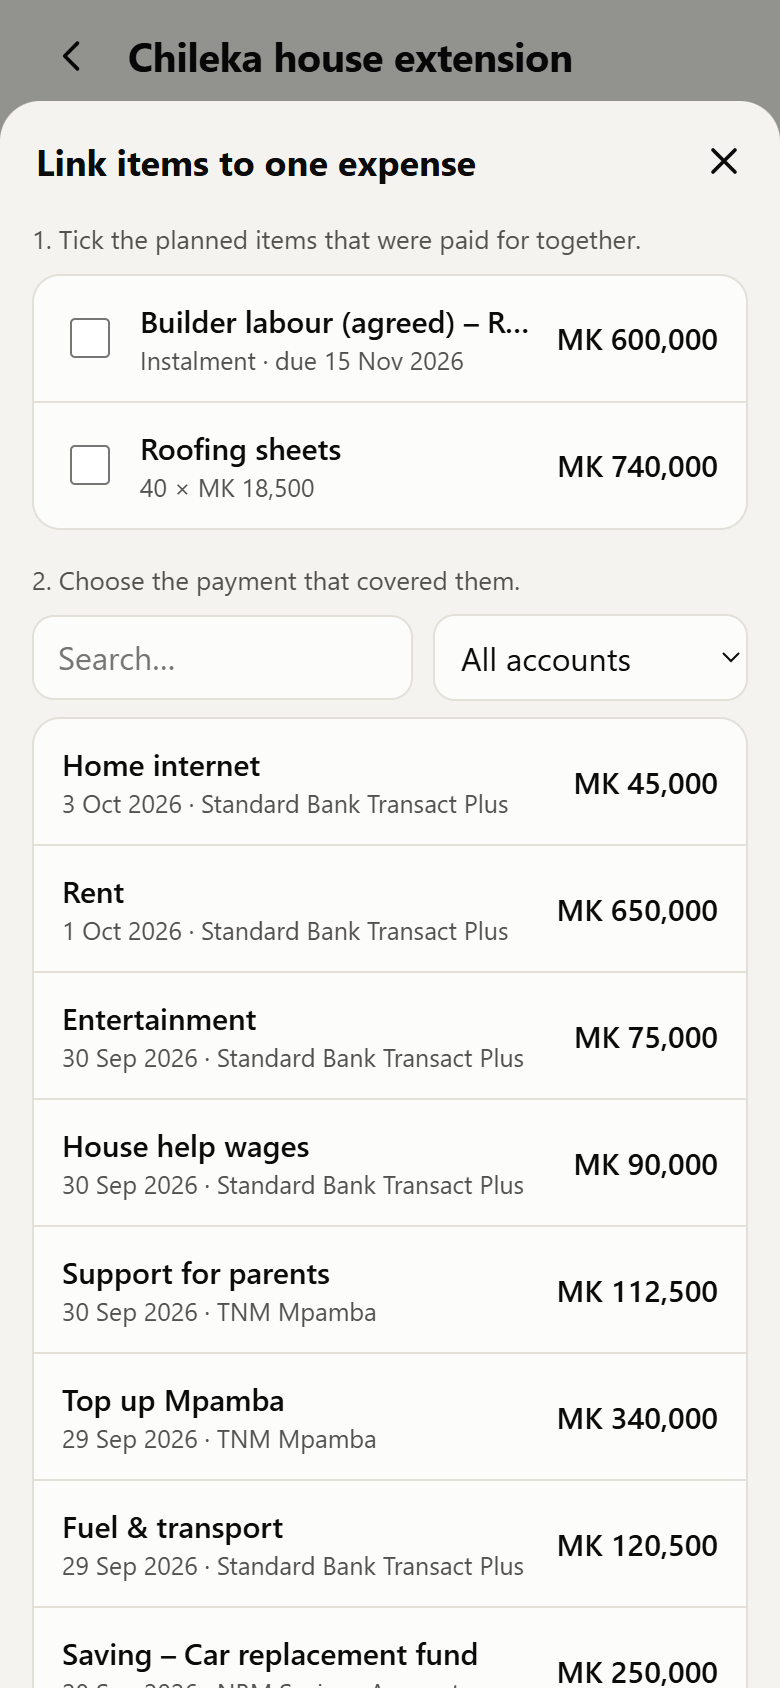
Paid one supplier for cement and sand together? Tap Link to expense on the project, tick the items, then pick the payment (or record a new one). Each item shows “paid in …” and the payment lists the items it covered. You can do the same from the expense form (choose the project, tick items) or from a transaction (Link project cost items).
10.2 Instalments (stage payments)
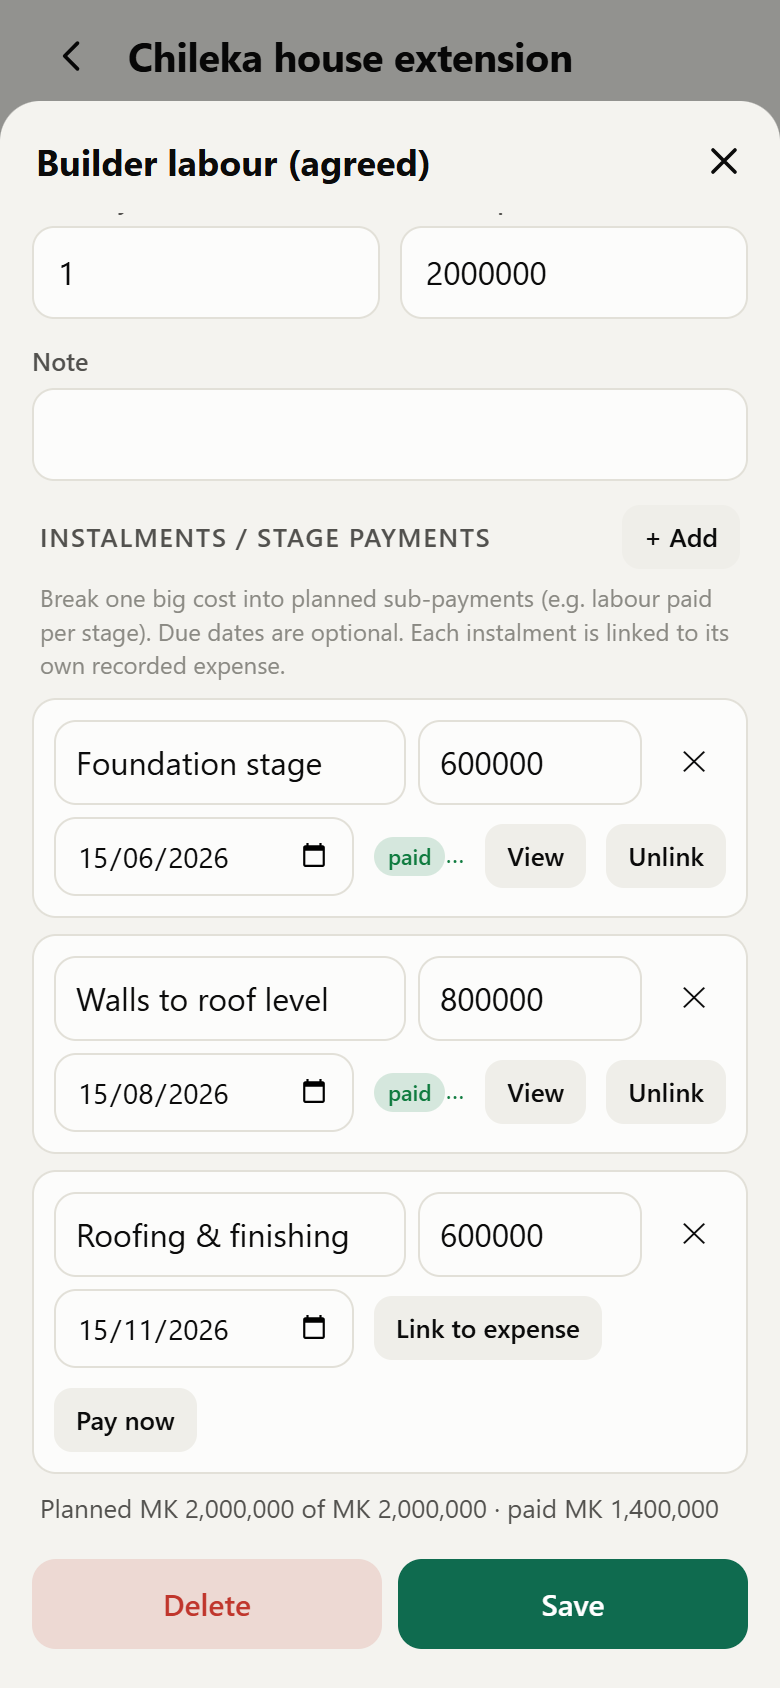
- Open a big cost item, e.g. Builder labour (agreed) at MK 2,000,000.
- Under Instalments / stage payments tap + Add for each stage: name, amount and an optional due date.
- Pay each stage with Pay now, or Link to expense for a payment already recorded.
The item shows “Paid MK 1.4M of MK 2.0M”, instalments with due dates appear in Due & expected, and anything not yet scheduled is shown.
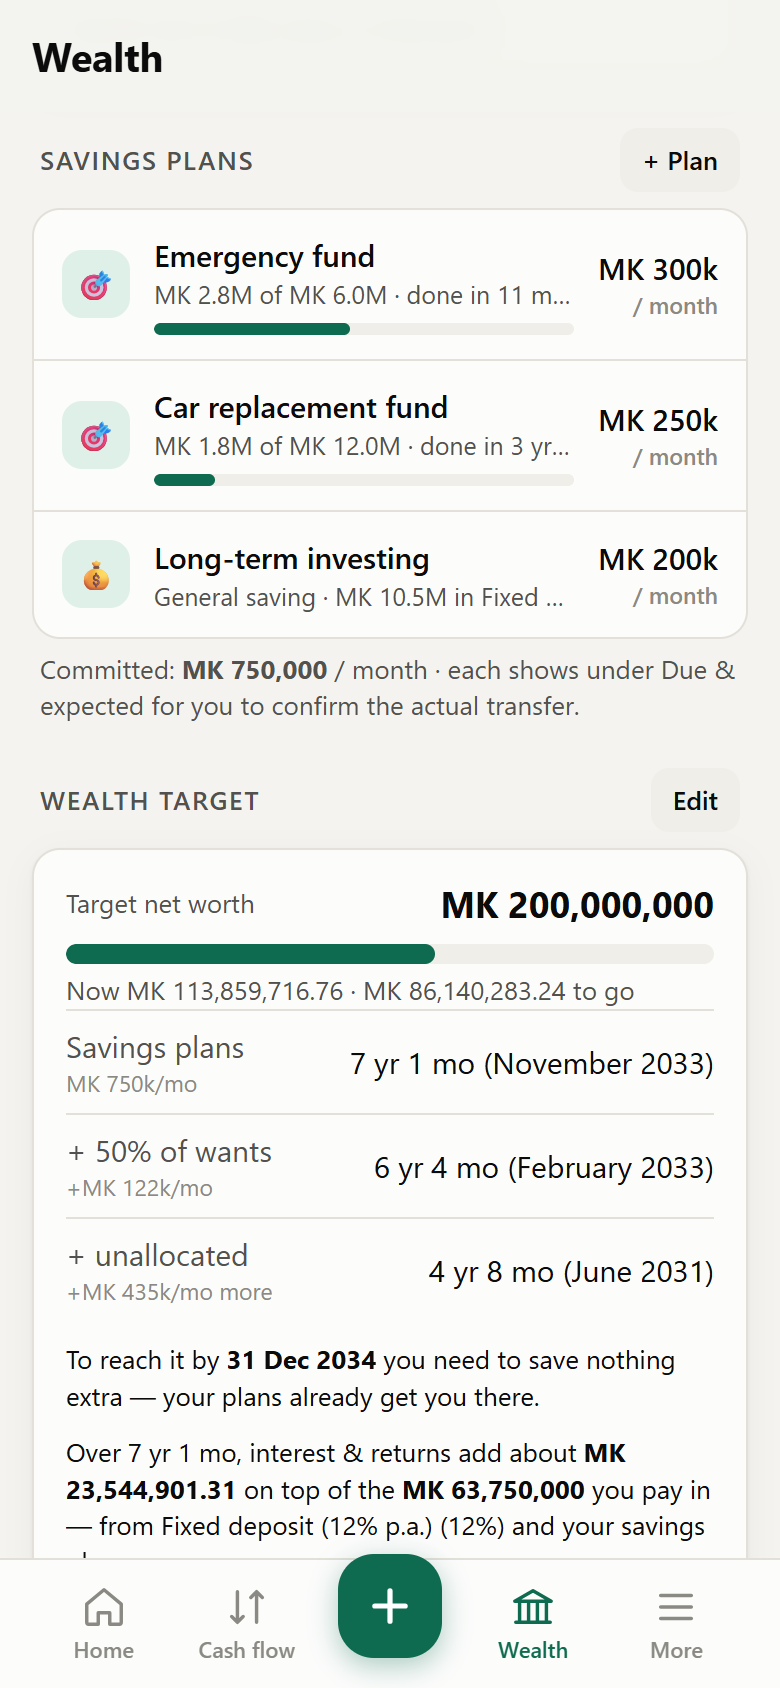
11. Savings plans & wealth target
11.1 How the savings plan on Home works
- Planned disposable = planned income − planned spending (budget lines and dated project instalments) − loan instalments for the budget month.
- Committed = the monthly total of your active savings plans. Anything already saved this budget month above a plan's amount is deducted as well. What remains is not yet allocated; a negative figure means you've promised more than your budget leaves.
- Actually saved this budget month: for each savings plan, what you really paid in against the plan. Every deposit into the plan's linked account counts, even if you didn't record it through the plan, so a MK 4M deposit against a MK 200k plan shows as MK 3.8M ahead.
- The reality check shows your actual average disposable income and wants over up to six completed budget months, and warns when reality falls short of the plan.
11.2 Create a savings plan
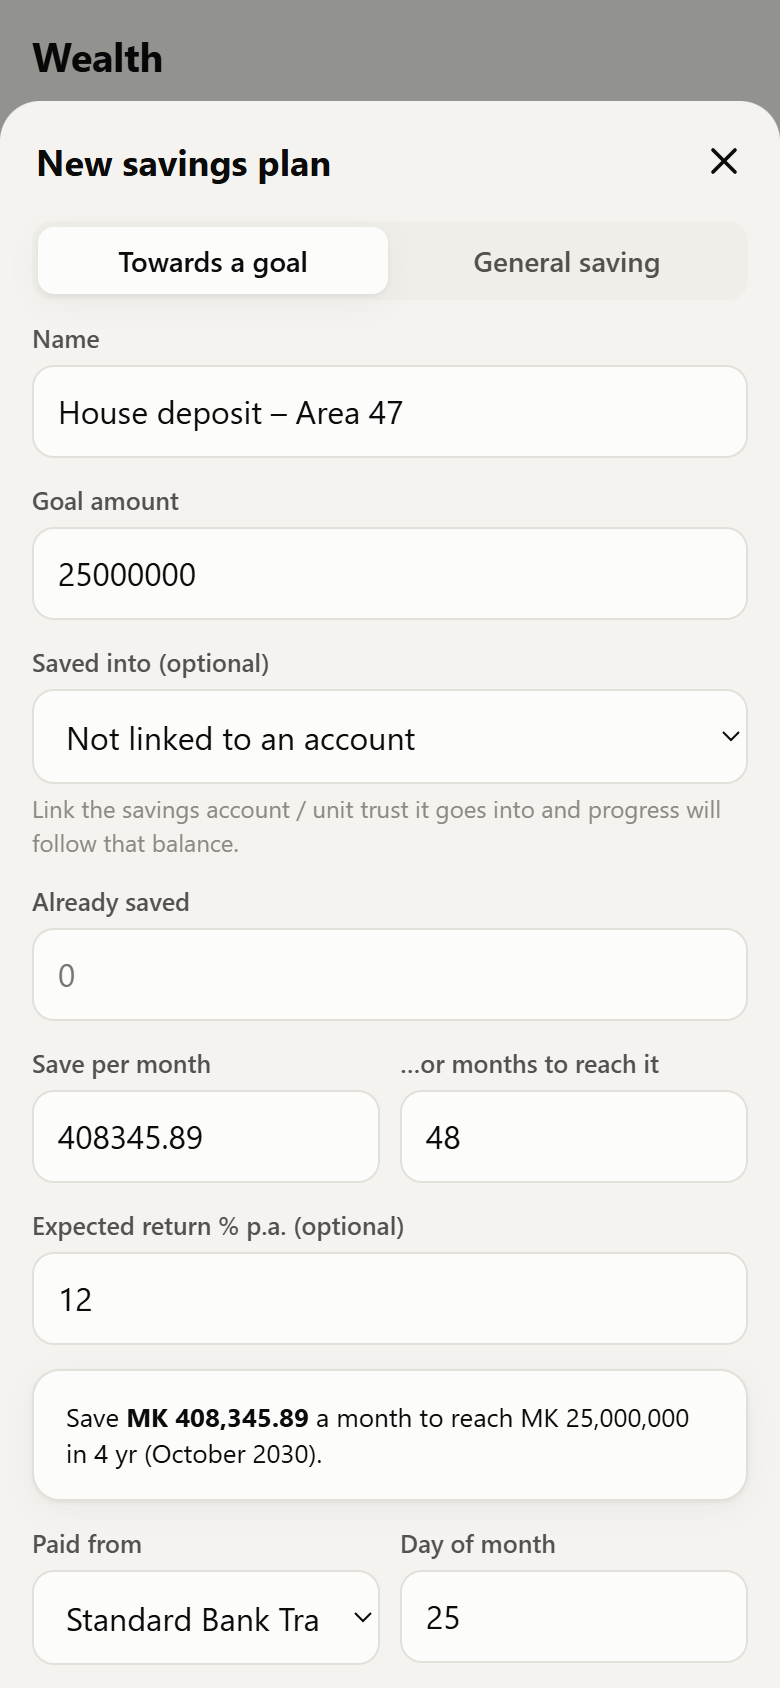
- Wealth → + Plan.
- General saving: a name and an amount per month. Towards a goal: also a goal amount.
- For a goal, enter either the monthly amount — the app works out how long it will take — or the number of months — it works out the monthly amount. Add an expected return % if the money will earn interest.
- Optionally link the account the savings go into (progress then follows its balance), choose the account it's paid from, the day of the month and the start date.
- Save. Each month's saving appears in Due & expected; confirming it records the transfer.
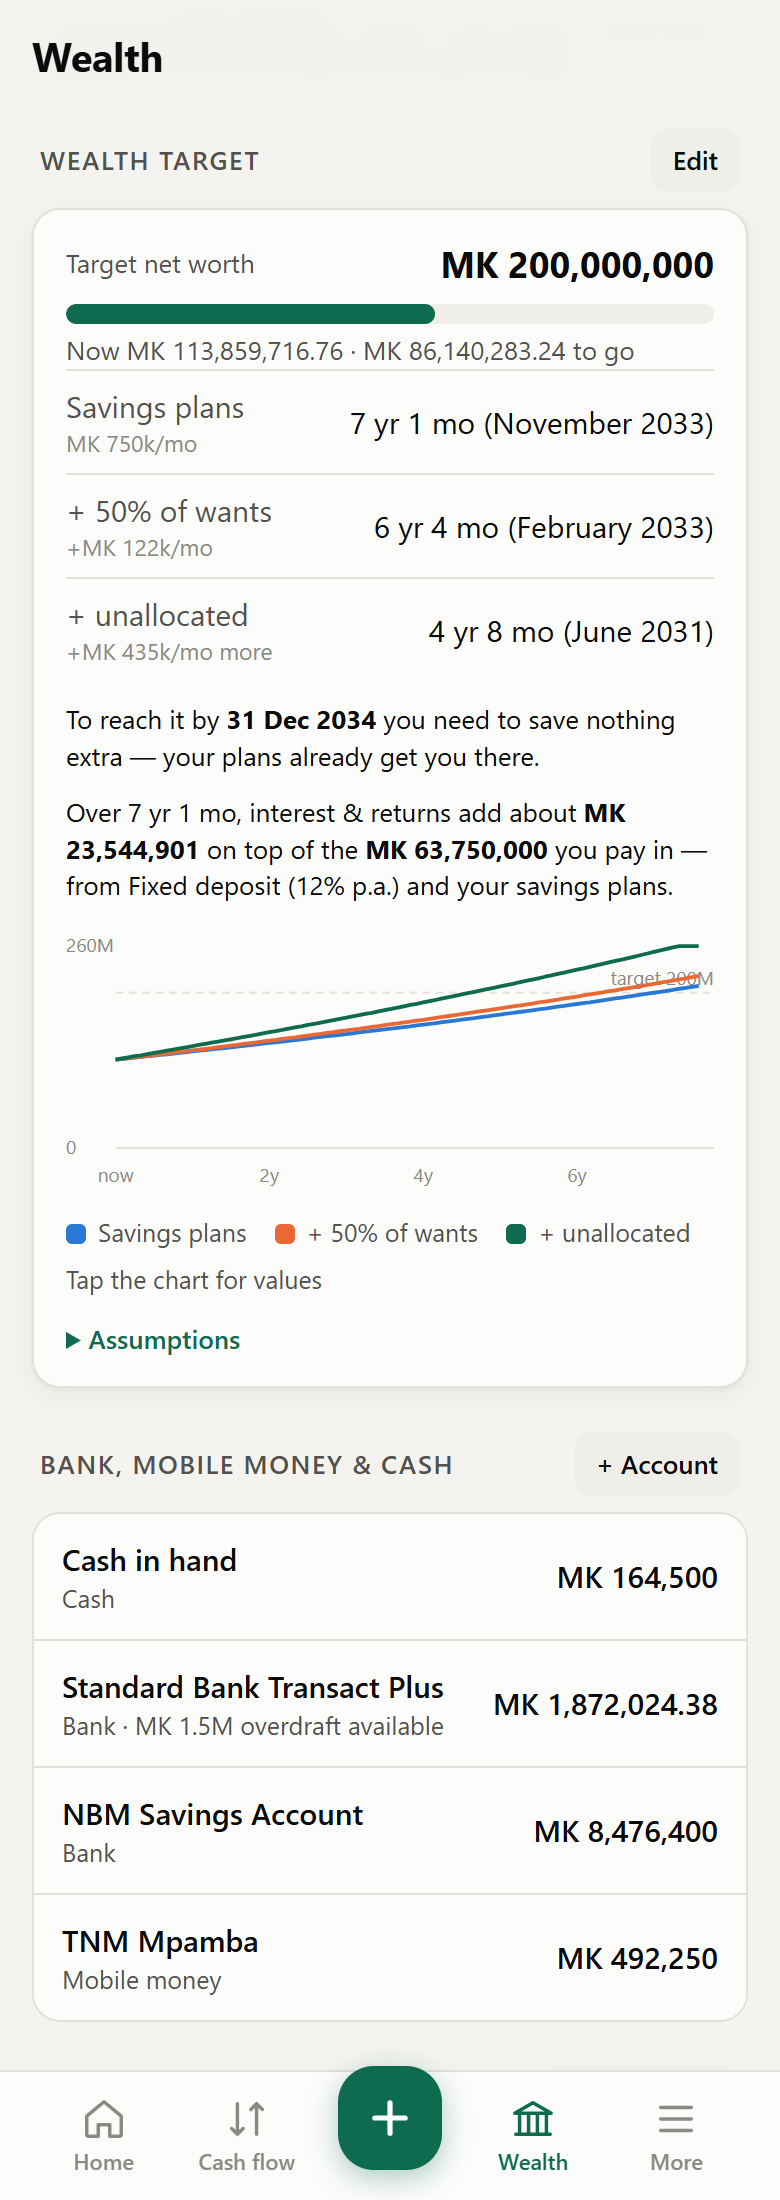
11.3 Wealth target & projection
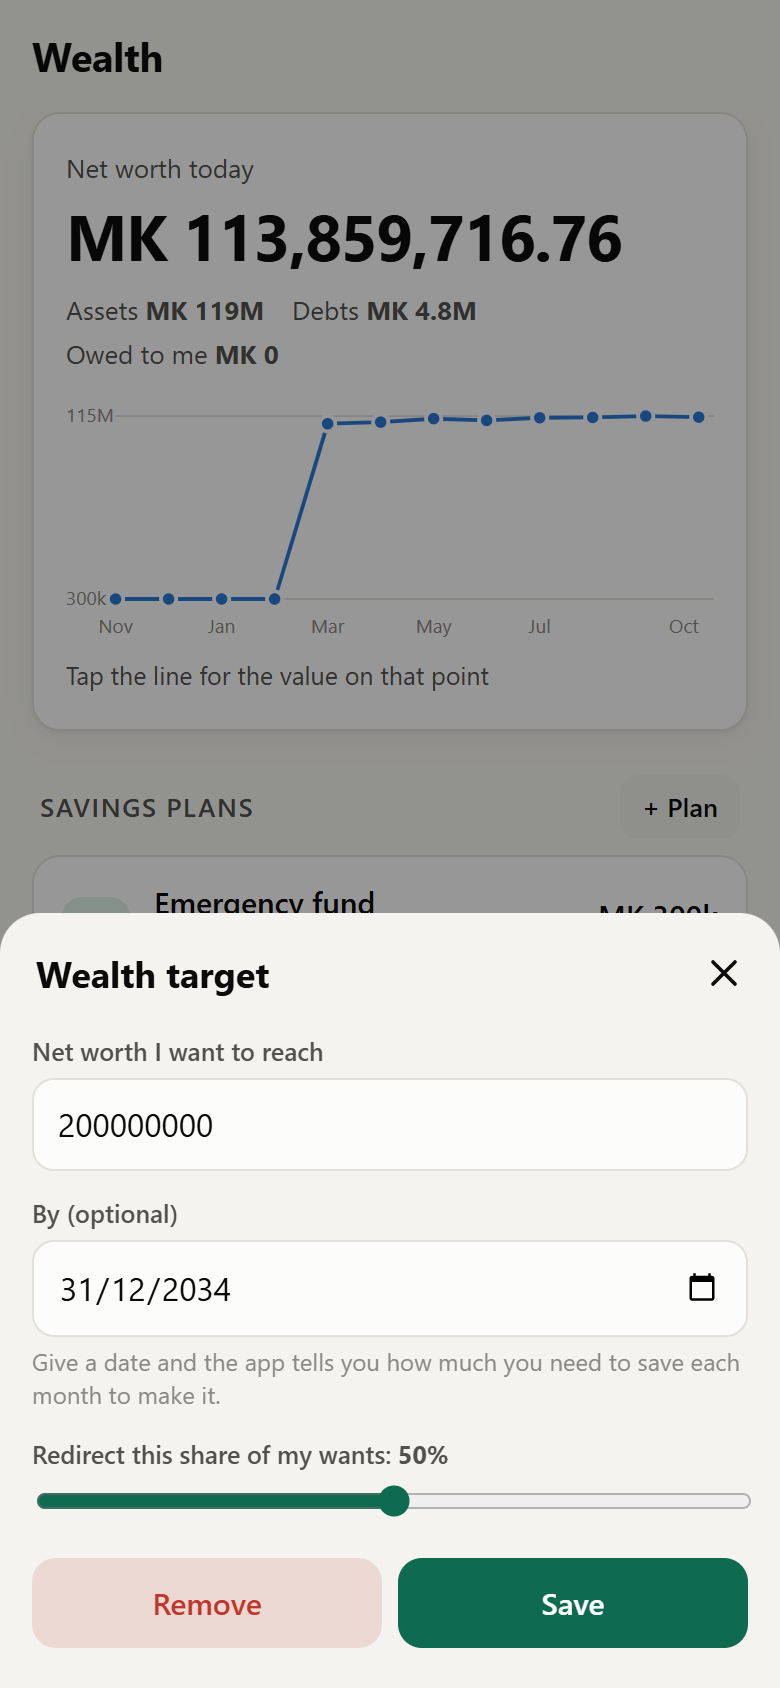
- Wealth → Wealth target → Set target.
- Enter the net worth you want, optionally a date, and how much of your wants you'd redirect.
- Save.
The app projects when you'll reach it three ways — with your savings plans; also redirecting part of your wants; and also saving the unallocated planned income — and, with a date, the monthly saving you'd need. Each interest-bearing investment (e.g. a fixed deposit at 12%) compounds monthly at its own rate, and the card shows how much interest and returns add on top of what you pay in. Savings plans grow at their expected return, or at the rate of the account they're saved into. Property and other 0% assets stay at today's value; loans, inflation and big purchases are not modelled.
12. Backup, settings & categories
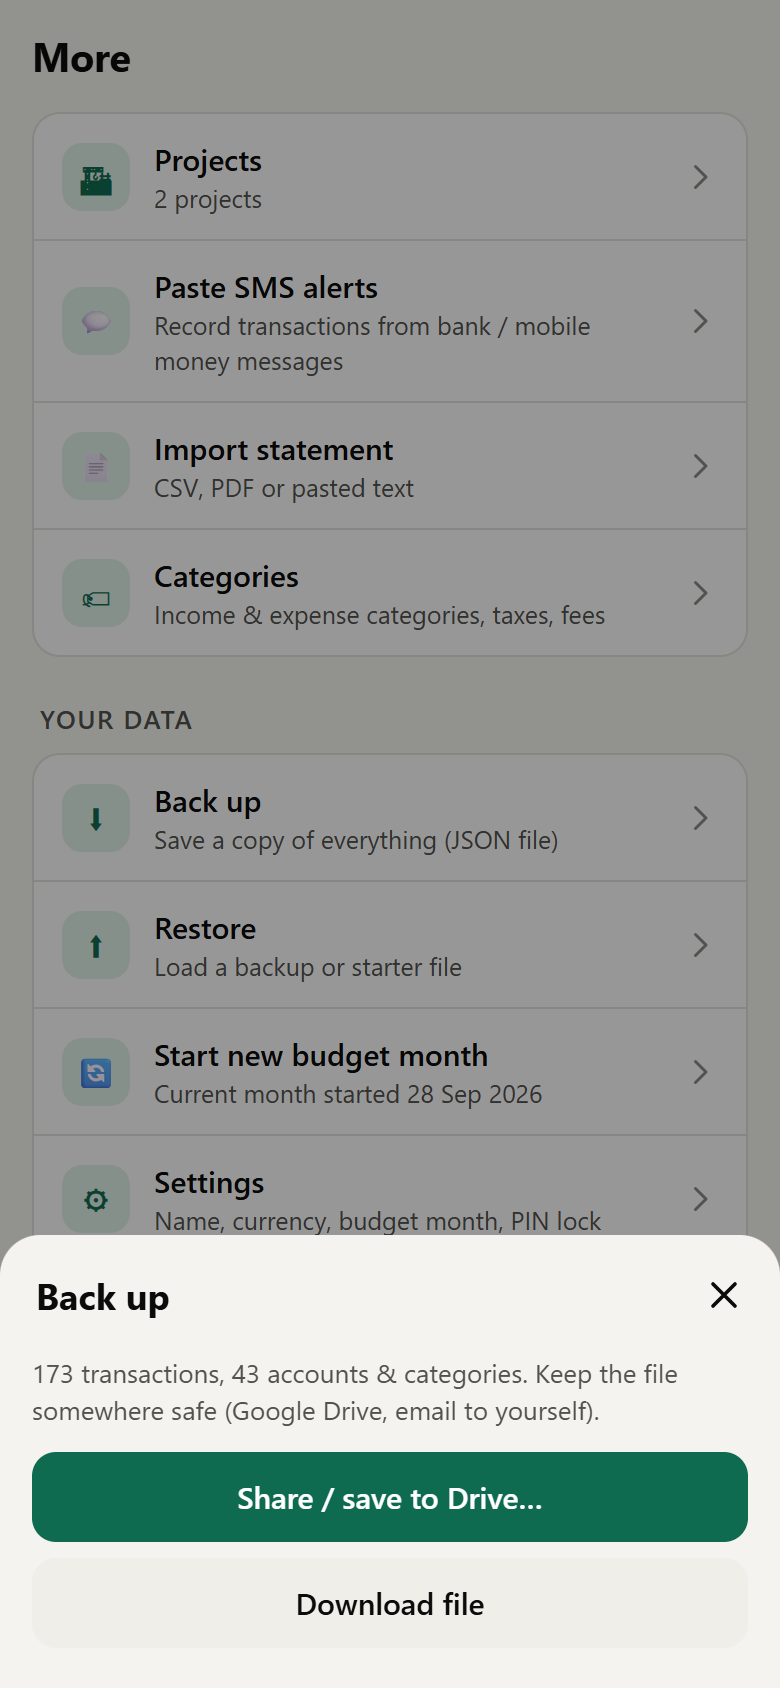
12.1 Back up and restore
Your data lives only on your phone. Back up regularly:
- More → Back up.
- Share / save to Drive… (save to Google Drive, Files or email it to yourself) or Download file.
To restore: More → Restore → choose the backup file → Replace my data.
12.2 Categories
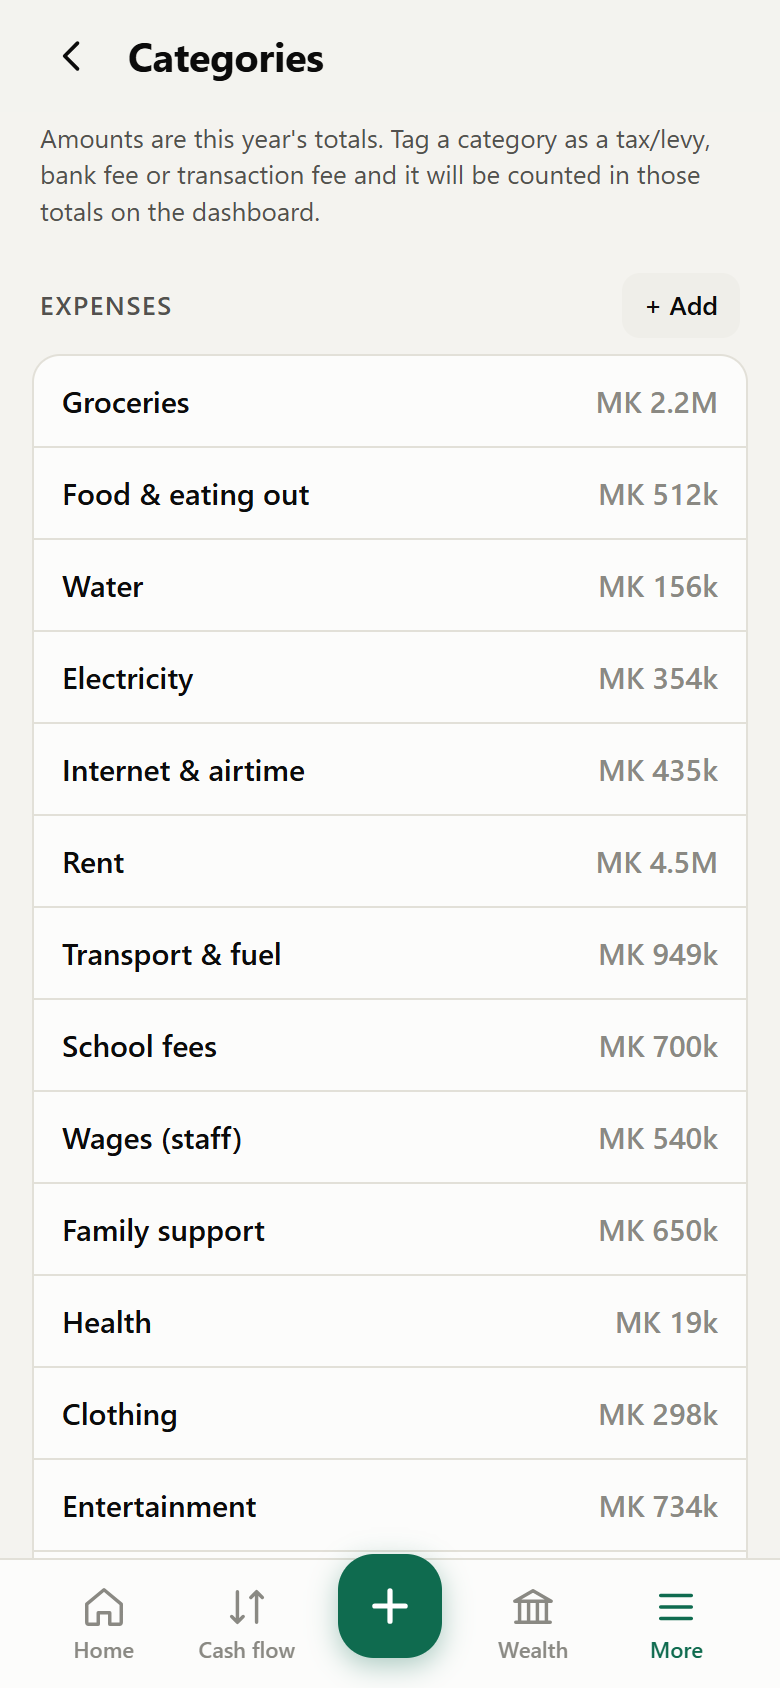
More → Categories lists income and expense categories with this year's totals. Add your own; set Counts as to Tax / levy, Bank fee, Transaction fee or Interest so it's counted in the right total.
12.3 PIN lock and erasing
Set, change or remove the PIN in Settings. Erase all data on this phone (Danger zone) wipes everything after a confirmation.
12.4 Updating the app
When a new version is published, open the app while online, then close and reopen it — the update installs itself. Your data is unaffected.
13. Try it with demo data
The file zachuma-demo-data.json contains six months (April – early October 2026) of realistic data — the data in every screenshot here:
- Accounts: Standard Bank Transact Plus (salary account, MK 1.5M overdraft — used in April), NBM Savings Account, TNM Mpamba, cash in hand.
- Salary MK 2.8M due on the 25th but paid on the 26th–28th; the budget month is set to manual rollover and was rolled over on each salary day.
- Assets: house in Chileka (MK 80M), Toyota Corolla (MK 15M), fixed deposit MK 10M at 12% p.a. with monthly interest, Illovo shares bought two years ago for MK 300,000 at K250 and revalued to K1,450 and then K1,800.
- Loan: MK 5M from the bank at 35% p.a. over 4 years, four instalments paid; and MK 200,000 lent to a friend at 10%, repaid.
- Budget lines: rent, utilities, groceries, fuel, school fees, wages, family support, entertainment — with daily spending, transfers, cash-outs, fees and levies.
- Projects: a Chileka house extension (materials paid in one supplier payment, labour split into stage payments) and a home office.
- Savings: emergency fund and car replacement goals, a long-term investing plan, and a MK 200M wealth target.
To load it: download the file → open Za Chuma → More → Restore → pick the file → Replace my data.
14. Glossary & FAQ
| Net worth | Assets (accounts, investments, property, money owed to you) minus liabilities (loans, credit, overdrawn amounts reduce assets). |
| Cash | Bank accounts + mobile money + cash in hand — the real balances, never the overdraft limit. |
| Opening balance | The cash you brought into the period: the previous period's closing cash. |
| Disposable income | Actual: income − needs − taxes & fees − loan interest and principal − untagged spending. Planned: planned income − planned spending − loan instalments. |
| Wants / wastage | Spending you tagged as a want or luxury. The share of spending that went on wants. |
| Budget month | The period your budgets cover — calendar month or pay day to pay day. |
| Expected / recorded / skipped | States of a planned item: waiting, confirmed with an actual transaction, or deliberately skipped. |
| Revaluation | A change in an asset's value (share price, property valuation). A gain or loss, not cash. |
FAQ
Does Za Chuma connect to my bank? No. It never logs in anywhere; you paste SMS alerts or import statements yourself.
Where is my data? In your phone browser's storage for the app's address — nowhere else. Back it up.
My balance in the app differs from the bank. Open the account → Set balance → enter the bank's figure. The difference is recorded as unrecorded spending or income.
The salary came late and spending went into the wrong month. Use the manual budget month and roll over when the salary arrives (section 7).
Can I use it on two phones? Each phone keeps its own data. Move data with Back up → Restore.